Silverlight is back in action with its latest release as "Silverlight 2.0", making mark all over now in Web developers communities around the world.
We all know from previous versions of Silverlight that it depends on Silverlight runtime, I don't know why Microsoft has not put that as integral part of .NET 3.0/3.5 Framework itself, If Ajax can be built in feature then why we still need silverlight runtime to download separately.
Well,Lets not bother much about this, You need to have Silverlight SDK to be download so as to design and develop Silverlight based applications. This can be downloaded from Microsoft website.
Once you install a file name as "Silverlight_chainer.exe" setup file, Then you can say you are ready for Silverlight experience.
You can find Silverlight Template with two options as "Silverlight Application" and "Silverlight Class Library" , You choose application to proceed, well do notice that you will not find those option if you go for Multitargeting option to .NET 2.0 and 3.0, please make note of this that you select right .NET Framework.
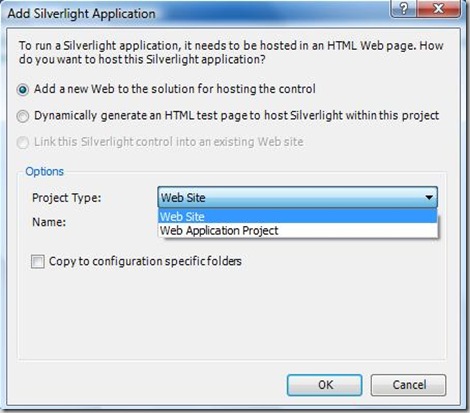
Once you click on OK, you will get following screen :
Now, its quite confusing for newbies, so if you are not familiar with those two options, I think their text is quite self explanatory.
One will be just sample host and another will be with application and host. Go for WebSite option and click on OK.
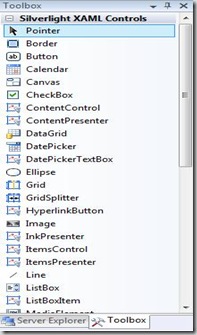
Now check the Toolbox and Solution Window one by one:
Big Surprise..I ask many people but I don't got any clue yet, why those intrinsic controls of Silverlight XAML Controls on Toolbox cannot be Drag and Drop on Design window but it can get invoke in XAML Code window..I don't know whether it won't happen at all or its a BUG !
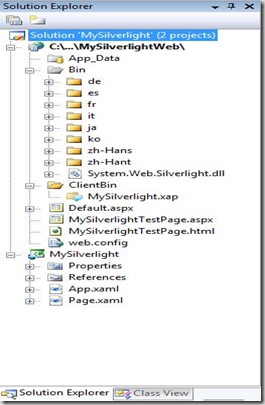
Now check Solution Explorer Window :
As you can see that since we have chose "WebSite" option while creating new Silverlight application, due to that choice we have several things here, notice the System.Web.Silverlight.dll , Notice MySilverlight.xap file. This .xap is nothing but manifest and contains all necessary information to run application.
We also have 2 test pages as "MySilverlightTestPage.aspx" and "MySilverlightTestPage.html".
Upto this we took lap around Silverlight 2.0 Beta 1, Now lets see some more information on customizing the Install Experience of Silverlight.
Normally you see the following screen when you don't have Silverlight runtime :
You can very well customize this message and you can also apply styles to it to make it more friendly and generous to user.
If you see the code of "MySilverlightTestPage.html" as :
<objectdata="data:application/x-silverlight," type="application/x-silverlight-2-b2" width="100%" height="100%">
<param name="source" value="ClientBin/MySilverlight.xap"/>
<param name="onerror" value="onSilverlightError" />
<param name="background" value="white" />
<a href="http://go.microsoft.com/fwlink/?LinkID=115261" style="text-decoration: none;">
<img src="http://go.microsoft.com/fwlink/?LinkId=108181" alt="Get Microsoft Silverlight" style="border-style: none"/>
</a>
</object>
Yes, .xap file is there under ClientBin, So is Silverlight.js file gone?, Answer is no, its still under framework folder and you can very well invoke that too.
In this object tag, I can wrap this one with <div> and I can create my own version of install experience to make it more user friendly and customizable.
Now its turn for "MySilverlightTestPage.aspx", well now you have <asp:Silverlight> control for your help, It has <PluginNotInstalledTemplate> tag to display error message, I have customize this to show you how it looks like.
<div style="height:100%;">
<asp:Silverlight ID="err"runat="server" > <PluginNotInstalledTemplate>
<divstyle="vertical-align:top;"align="center">
Explore.NET with Vikram Pendse<br />
Blog is Silverlight enabled, Please install Silverlight by clicking on image below<br /><b>its FREE Download..so Download it and exprience the richness with Silverlight</b><br />
</PluginNotInstalledTemplate>
</asp:Silverlight>
<asp:Silverlight ID="Xaml1"runat="server"Source="~/ClientBin/MySilverlight.xap"MinimumVersion="2.0.30523"Width="100%"Height="100%" />
</div>
This will customize the typical Traditional looking error message to friendly and user defined one.It will look like as below :
This is how you can control totally the Install Experience of Silverlight using Silverlight 2.0 Beta 1.
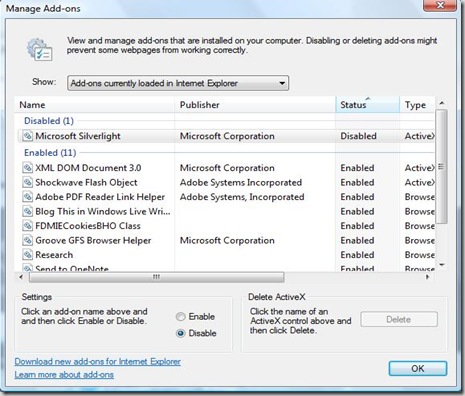
Well, Twist in this is that, if you have installed Silverlight then how will you get this screen?..any guesses?..simple simple simple..
Just Open Internet Explorer Click on "Tools"-->"Manage Add-ons"-->"Enable or Disable Add-ons", This will show you a window with variety of options, you just need to Click on Microsoft Silverlight and make it Disable so as to experience this customize Silverlight Install Experience which we have created above.
That's it!! ..done with it..I will be back soon with more actual Silverlight Applications in form of articles here which will be thrill to program.
-Vikram.


No comments:
Post a Comment