Thursday, December 25, 2008

Integrating SQL Server Reporting Services with ASP.NET 3.5

Today, I am going to discuss Basic and Simple demo on Integration of SSRS with ASP.NET 3.5, I am assuming that readers have already have installed Visual Studio 2008, SQL Server 2008 [with Reporting Features] and Report Builder 2.0

Just to have idea those who are new to SSRS, SQL Server Reporting Services 2008 are in a way unique due to their architecture, Now we have a separate block of Tablix, Tablix is combination of Table + Matrix [In short, Table + Matrix = Tablix].

Since Microsoft have great association with .NET Dundas visualization tool, so now you can implement Graphs, Gauges in your reports with ease and with much more Rich UI, which you can create using tools like Report Builder 2.0.

I am showing this example with Northwind Database. I assume you are comfortable with Report Builder 2.0 to design your report.

What I would like to discuss over here before we go for ASP.NET integration is how we can enhance performance of Report say for like getting 1 lac or more records, So We can Implement Cache for the same.

Step 1 : Cache the Report for better Performance

Start your Reporting Manager instance [ You can find URL of that in your Reporting Services Configuration], Once you add Report to your directory, Click on Report and locate “Properties” tab, Click on Properties and you will find Cache settings in “Execution” option on left hand side.

SSRS1

SSRS2

Note : You can only set Cache if and only if you provide valid credentials for “DataSources” option just above “Execution” option, else it will not allow you to implement Cache.

Once you apply Cache, Test report in Report Manager, Close the Report Manager instance and Start Visual Studio 2008

I tried from 60k to 1 lac records and it worked out very smoothly, so I personally find this feature as “Edge” over Crystal Reports.

Step 2: Integrate Report with ASP.NET 3.5 and Send parameters to Report from ASP.NET Web Application

You already have “MicrosoftReportViewer” Control in your Visual Studio 2008 under Reporting tab on Toolbox.

I am now taking one instance of ReportViewer with one TextBox to accept paramaters and one command button to submit that parameters to Report.

ASP.NET Code :

<div>
   <table>
       <tr>
           <td>Enter Customer ID: </td>
           <td><asp:TextBox Width="180" runat="server" ID="txtparam"/></td>
           <td><asp:Button Text="Show Report" ID="btnSubmit" runat="server" onclick="btnSubmit_Click" /></td>
       </tr>
   </table>  
   <rsweb:ReportViewer ID="rptvw" runat="server" Height="600px" Width="800px"></rsweb:ReportViewer>
   </div>

C# Code :

using Microsoft.Reporting.WebForms;

….

protected void btnSubmit_Click(object sender, EventArgs e)
    {
        rptvw.ProcessingMode = ProcessingMode.Remote;
        rptvw.ServerReport.ReportServerUrl = new Uri("http://localhost/reportserver");
        rptvw.ServerReport.ReportPath = "/Northwind/NewNorthwind";

        ReportParameter[] param = new ReportParameter[1];
        param[0] = new ReportParameter("CustomerID", txtparam.Text);
        rptvw.ServerReport.SetParameters(param);

        rptvw.ServerReport.Refresh();
    }

SSRSOP

Explanation of Code :

Currently, I am sending only one parameter as “CustomerID” to my Report. SSRS basically supports two Processing Modes as “Remote” and “Local”, Since there is no support available for “Local” mode, Developers are suppose to fetch reports directly from Reporting Server, So I have set mode as “Remote” and have set those paths which you can see in code.

This is most simple way to integrate SSRS with ASP.NET, some other ways are using WebService [WSDL which RS exposes], but I personally find that time consuming and bit difficult compare to this one.

Hope this will give you idea about how you can enhance performance of your report with implementation of Cache and how easy is integration with ASP.NET 3.5 Web Application.

On ending note..

SSRS now give you power to export your reports in various formats like XML,PDF,CSV,TIFF and other Standard Office document formats, Also Report Builder 2.0 now implements most of the Office features like Zooming and Ribbon Controls for design and editing etc.

Vikram.

Thursday, December 11, 2008

IIS 7 : Reports and Database Manager features.

First of sorry for so much delay in putting blogpost, I am out of my hometown for some work so hardly get time to blog and Internet access is sporadic.

Today I am going to share with you the simply amazing tool of IIS7. It is add-on to IIS7 but it is very much handy especially for those who monitor performance and into Website management. Those people along with others now can have complete Drill-down reports from IIS7 which can be export to CSV,HTML,XML etc.

Also many of the developer find hectic to log on to SQL Server instance for firing queries and modifying Table data and Schema. Now IIS 7 provides handy add-on of Database Manager, let’s discuss it one by one.

For this you need Admin Report Kit for IIS7 (ARKIIS), find it here :

http://www.iis.net/downloads/default.aspx?tabid=34&g=6&i=1782

Download and install it, it won’t ask you for any other dependency, all you need is IIS7 installed in place.

IIS Reports :

Once you installed it, you will find it like this once you start IIS7

image1

Click on IIS7 Report [Assumption : You have at least one website hosted on IIS7]

image2

You will get “Get Report” option and “Filters” to view specific reports from two specific Date intervals.You will also find Export option over here, as we discuss above, you can export it in various formats, along with that you have Pie and Line as other options of Chart, Column is default.

image3

As you can see above, This is how you will get report, drill down to date and categories like which page,script or resource had maximum hits etc. in proper grid as well as graph format. Beside this there are several options too which you can see in image below.

image4 Other details of visit you can see in Grid Format just below Chart like this.

image6

So, don’t wait, download it and start using, it is a great tool !

Database Manager : 

As we have discuss above, now Database Manager is built-in in IIS7, it is very similar to SQL management studio [Looks wise] and other hosting consoles which we get on hosting sites for Database.

image7

Here you can create Tables with Schema, Stored procedures and you can play around with it, lots of general Data Operation functionalities are provided.

image8

image9

Hope this article will encourage you to move from IIS6 to IIS7 and make use of these great tools, I will back with loads of new stuff on ASP.NET and Silverlight in coming days, so I am back here again, do let me know your suggestions and feedback.

Vikram. 

Tuesday, December 2, 2008

Silverlight 2 : Playing Multiple Videos with One Media Element

You may think that Playlist is always good option, though it is, sometimes it takes too much time to develop and test, so for small amount of video files, you can do play multiple videos by making use of Media_Ended() event.

I found many new things while doing demo of this, First surprise was that I was not able to declare “var” globally, I am researching on it why it had happened, Hashtable and ArrayList are seems to be not allowed in Silverlight though they are normal collections with .net framework, a surprise for me !

Code goes here :

public partial class Media : UserControl
    {


        int i = 1,j;
        Dictionary<int, string> temp = null;


        public Media()
        {
            InitializeComponent();

            temp = new Dictionary<int, string>();

            temp.Add(1, "http://localhost/Video1.wmv");
            temp.Add(2, "http://localhost/Video2.wmv");
            temp.Add(3, “http://localhost/Video3.wmv”);

            j = temp.Count;

            this.Loaded += new RoutedEventHandler(Media_Loaded);
            MasterMedia.MediaEnded += new RoutedEventHandler(MasterMedia_MediaEnded);
        }


        void MasterMedia_MediaEnded(object sender, RoutedEventArgs e)
        {
            if (i == j)
            {
                MasterMedia.Stop();
            }
            else
            {
                i++;
                MasterMedia.Source = new Uri(temp[i], UriKind.Absolute);            
            }
        }


        void Media_Loaded(object sender, RoutedEventArgs e)
        {
            if(i == 1)
              MasterMedia.Source = new Uri(temp[i], UriKind.Absolute);            
        }
}

As I told you that Hashtable and Arraylist was not in position so I have declare a “Dictionary” over here globally. I am adding URLs of media in it along with a key as integer so as to recognize what needs to be play. That can be track using global variables i and j.

This is the simplest way to play media in loop and you will observe the great usage of Media_Ended() event over here, how every time its getting fired. Do let me know your feedback on this if there are any more smart ways to do so.

Vikram.

Saturday, November 29, 2008

Terror attacks on Mumbai : India’s 9/11

This blog post is tribute to those 14-15 Brave Mumbai Police Cops, NSG Commandos, Army personals and Staff of Taj and Oberoi Hotel,Nariman House who lost their life, who got very deadly injuries and who lost their friends and family members in a brutal and dirty attack by Terrorist on India’s biggest Metro and Capital of Maharashtra “Mumbai”.

This I personally think was most deadly attack ever happen anywhere in the world, more worst than 9/11 happen in US.160 innocents Dead and more than 300+ injured badly, more than 50 hours of gun and grenade battle at 10 different places of Mumbai.

1 INDIA-MUMBAI/SHOOTINGS
2 4

[Photos from various Blogs and News updates on Internet]

Big loss to our nation, but Indian and local government fight it out very well and finally able to wipeout terror out of Mumbai finally on early morning today along with unforgettable contribution of Police and Army of India.

I Pray to God for all those who lost their lives to protect us,protect nation, I pray for those who lost their love ones..May God Bless !

Vikram.

Monday, November 24, 2008

DeepZoom with PhotoZoom and Silverlight.live.com

I have already wrote article on How to build DeepZoom with DeepZoom Composer, I know after that another version of DeepZoom came up, but changes are not that much to discuss,still you can see old one for reference, This is now the depolyment part or you can say extension to my old article at :

http://pendsevikram.blogspot.com/2008/07/deep-zoom-with-silverlight-2.html

First thing to note that, we are discussing first "PhotoZoom" which practically don't require any DeepZoom Composer and even those users who are not aware of DeepZoom, now even they are getting empower with PhotoZoom, so they will be also now able to create DeepZoom on fly.

What is PhotoZoom??

"PhotoZoom makes it easy for anyone to create zooming albums from their uploaded photos. It is an experimental site, developed at Microsoft, that uses the Deep Zoom technology in Silverlight 2."

PhotoZoom is FREE !! :)

Step 1: Visit http://photozoom.mslivelabs.com/ ,hope you already have Live ID, if not please get one, its worth doing so.

Step 2: Once you sign-in with your Live ID, you will get :

zoom1

Step 3: Upload Snaps/Photos using Browse button,Note on thing over here that You may need Silverlight Runtime, since I saw that Once you click on "Browse" button,it loads Silverlight File Upload app, so you may need runtime here if you don't have it.

Also PhotoZoom have provided facility to get snaps from RSS feeds/Atom, you can also Email or even Delete Album.

zoom2

Step 4: Upload all the snaps, if you wish to give title to each snap, you can simply click on any of the snap and give caption/details over there like :

zoom3

One thing to note here which I have highlighted in Red box, Can you see it creates what?? ..yes DeepZoom Image file. see extention  is 1.xml, so each images goes to collection like we have it in DeepZoom [ I don't mind to say this PhotoZoom is nothing but Web Version of DeepZoom Composer ;-) , Great job Microsoft !! :-) ] 

Step 5 : You are ready with DeepZoom, can't see that? ok, then just you need to click on "View Zooming Album" option on right side of the template and you are totally ready with DeepZoom!!

zoom4

You can see output instantly on the same page :

zoom5

This is how it looks like, Observe topmost section with "+ -"  sign for zooming and it also shows how much it has zoom with third button next to "-", If you observe bottom most red block, Yes ! you get <iframe> so you can plug and play it anywhere you want, isn't this much simpler and friendly? do let me know your feedback !

[Between, snaps which you looking at in above snaps are from my 1st Session on Silverlight at Pune Developer Conference 2008 :) ]

DeepZoom with Silverlight.live.com

Now in second section of this article as we started with Silverlight streaming and DeepZoom, so with referecne to that,here I assume that you have already followed all steps of my previous article at :

http://pendsevikram.blogspot.com/2008/07/deep-zoom-with-silverlight-2.html

So once you have set of images ready, go to Silverlight.live.com site to host that DeepZoom and to stream it across.

If you are not aware of Silverlight.live.com, you can read my old article at :

http://pendsevikram.blogspot.com/2008/10/silverlight-live-streaming.html

Here you need to follow same procedure, but this time with xap, you need to also copy "GeneratedImages" folder from DeepZoom along with one Manifest.xml file whose contents are like :

<SilverlightApp>
  <version>2.0</version>
  <source>VikramDeepZoom.xap</source>
  <width>400</width>
  <height>400</height>
  <background>gray</background>
  <isWindowless>false</isWindowless>
</SilverlightApp>

Zip this xap,xml file and GeneratedImages folder and directly upload it as Application on Silverlight.live.com, then follow the same old procedure of editing it there, again you will get scripts and iframe code generated over there, so you can plug that and you are ready with your DeepZoom Streaming application.

Hope this will be useful for you and encourage you to convert all your photos which you store on drive to a classy Online DeepZoom Album !!

Vikram.

Wednesday, November 19, 2008

Silverlight 2 : Master Pages implementation in Silverlight 2

The title of the post may be sound funny, and it was fun since many arguments did happen while whole process of this implementation.

There are several post made by several expertise and enthus on the same, Basically a big question is do we need this?? since all Silverlight application however powerful they are, they are still run under umbrella of ASP.NET. I agree on this !

But there might be some business scenarios, if not now then might be in future, so keeping this vision in mind, here I am showing you a very easy way to implement Master Page concept in Silverlight, It is not difficult code and neither we need to touch App.xaml file..here I go :

SLMasters1

This is what I want to build, You can see header part "Explore .NET with Vikram Pendse" followed by buttons [Third Party Silverlight Control may provide you good Menu bar too] and footer as "Microsoft .NET for everyone !!".

Now once I click on Home or RSS or any other button, Idea is to keep header and footer as it is and load other page contents in middle blank portion as content if we assume this page as Master page. so the required XAML code is,

XAML Code :

<Grid x:Name="LayoutRoot" Background="AliceBlue">
        <Button x:Name="btnBlog" Height="22" Width="67" Content="Blog" Margin="161.5,36,171.5,0" VerticalAlignment="Top" d:LayoutOverrides="Width, Height" Click="btnBlog_Click"/>
        <Button x:Name="btnRSS" Height="22" Width="67" Content="RSS" HorizontalAlignment="Left" Margin="94,36,0,0" VerticalAlignment="Top" d:LayoutOverrides="Width, Height" Click="btnRSS_Click"/>
        <Button x:Name="btnHome" Height="22" Width="67" Content="Home" HorizontalAlignment="Left" Margin="27,36,0,0" VerticalAlignment="Top" d:LayoutOverrides="Width, Height" Click="btnHome_Click"/>
        <Button x:Name="btnDownload" Height="22" Width="67" Content="Download" Margin="0,36,104,0" VerticalAlignment="Top" HorizontalAlignment="Right" d:LayoutOverrides="Width, Height" Click="btnDownload_Click"/>
        <Button x:Name="btnAbtus" Height="22" Width="67" Content="About Us" Margin="0,36,37,0" VerticalAlignment="Top" HorizontalAlignment="Right" d:LayoutOverrides="Width, Height" Click="btnAbtus_Click"/>
        <TextBlock Height="23" Margin="94,8,116,0" VerticalAlignment="Top" Text="Explore .NET with Vikram Pendse" TextWrapping="Wrap" Foreground="#FF000000"/>
        <StackPanel x:Name="stk" Width="400" Margin="0,66,0,30"/>

        <TextBlock Height="23" Margin="106,0,104,3" VerticalAlignment="Bottom" Text="Microsoft .NET for everyone!!" TextWrapping="Wrap" Foreground="#FF000000"/>
    </Grid>

Here you can see that I am using "stk" as my contentplace holder stack where I will load the other pages on each corresponding button clicks, rest of the code is just routine design.

C# Code :

namespace SL_MasterPages
{
    public partial class Page : UserControl
    {
        int var = 0;

        public Page()
        {
            InitializeComponent();
        }

        private void NavigateRequest(int w)
        {
            if(w>0)
            {
                switch(w)
                {
                    case 1:  stk.Children.Add(new RSS());
                             break;
                    case 2:  stk.Children.Add(new Home());
                             break;
                    default: this.Content = new Page();
                             break;
                }
            }
        }

     private void btnRSS_Click(object sender, RoutedEventArgs e)
        {
            stk.Children.Clear();
            var = 1;
            NavigateRequest(var);
        }

        private void btnHome_Click(object sender, RoutedEventArgs e)
        {
            stk.Children.Clear();
            var = 2;
            NavigateRequest(var);
        }
   }
}

Here I have implemented for first two buttons, I am setting and resetting flag values for each button with a global variable as "var", and I am clearing stack in each click so as to keep contents dynamic in nature.

I have written a "NavigateRequest" sub proc which takes integer value just for switching between two pages. So this is very simple way to switch between the pages from one to anothet and result will be like..

SLMasters2

SLMaster3

Now you can see messages like "You are on Home Page", "You are on RSS Page", these you will get once you click on corresponding button on Main Header and you also have observed now that header and footer are constant in all case like Master Pages in ASP.NET

Hope this will encourage you to go ahead and explore it more and apply the same in all possible business scenarios which need this kind of implementation.

Feedback and suggestions for this are most welcome, I will be more than happy to know if there are any more simple and good way to implement such things.

Vikram.

Ultimate Windows Tweaker is here : Great job by Pune MVP !!

Another landmark is set in Indian IT and a proud moment for Pune City.

City based MVP Anand Khanse did a wonderful job. A free Ultimate Windows Tweaker which is a Tweak UI Utility for tweaking and optimizing Windows Vista, 32-bit & 64-bit is now available to whole world !!

It can simply be downloaded and used as a portable application to customize your Windows Vista to meet your requirements.

This was made public in recent South Asia MVP Open Day 2008 in Goa,India in presence of 60+ MVPs across Asia and  It was made public by Howard Lo, Microsoft's Regional Team Manager (APAC), in the prescense of Abhishek Kant, South Asia – MVP Lead and Abhishek Baxi, MVP Program Specialist.

You can check here for more details and download :

http://www.winvistaclub.com/Ultimate_Windows_Tweaker.html

It is very well design,developed and tested tool, if you have Windows Vista and If you don't have this tool, then you are missing something big thing !! so don't waste time..go there and download it..convey this to your other friends in communities and Vista buddies !!

Note : WinVistaClub is simply amazing portal for all kind of information on Windows Vista and its services, so do check that portal, for this, I have already added a WinVistaClub Link/Button on right side of my blog.

Vikram.

Wednesday, November 12, 2008

Windows 7 : Lap around new version of Windows

Windows 7 finally come to meet all of us in great event PDC2008, There is always lot of excitement when something new is getting launched. Why so..simple reason is people now a days are prefer more customize things and personal things which runs under their local language settings.

Well, I am here going to share my hands on experience with Windows 7, I humbly request my readers that, this build of Windows 7 is a testing build and pre-release beta, so whatever features which I am going to mention right now may be get change or even removed in coming builds, since its totally not our policy.

So lets go ahead and see what's new in Windows 7, This is I am planning to share in two sets of article, so may be I will again write one article if I found any more stuff to show you.

Windows 7

Installation :

IMAGE_038

It took around 18-20 minutes to install total build of pre-release of Windows 7, I tested it on 1 GB RAM, 80GB HDD,Intel Centrino Processor, worked very smoothly and yes most of the installation options are similar to Windows Vista.

Welcome to Windows 7 :

screen4

Very friendly and customizable UI is for Windows 7, First time even I was in surprise mode, I found many of the functional and UI part very much inline with Windows Vista Ultimate which is I work with everyday.

"Start" button I found very glowing one when I mouse hover it.

No Sidebar :

You must have observe that there is now no such compulsory Sidebar which is getting popped up on Windows start in Vista which also sometime becomes heavy due to Gadgets loaded on it.

From screen above you can see that, Now I can drag and drop gadgets and put them anywhere I want, This is new feature provided by Windows 7.

Right Click Menu :

SL7

Now you can see the "Gadgets" option which I was talking about.

New Improved Taskbar :

There was lot of demand from public to have good customizable and stable Taskbar, so here it is, with reference to first screen and rest :

SL5

SL6

One more thing I would like to mention that, there is not such "Quick Launch" stuff now, whatever Items you feel good you can drag drop those on taskbar to made them Quick .

You still have Thumbnail preview in Taskbar like Vista where you can see a simple snapshot of application which is active.

Now with Windows 7 , more spice is added to it, now you can see a small "Cross" red button on Thumbnail preview also where you can close certain application from preview itself.

Also a small up arrow now pops up with the recent files which have been open using that particular application.

To make certain application as "Quick" in Taskbar,now you have a option of "Pin this program to Taskbar".

Built in XPS Viewer :

XPS Viewer is now built-in with Windows 7

Clock and Show Desktop and Tray for rest of Icons :

SL8

You can see a small Tray with "Customize" option, now rest of all icons which are now "Quick" now sits over here in this small tray, which I personally feel a damm good feature !

No need to wild guess, yes the small Rectangle next to clock is now a "Show Desktop" button.[ I spend around 2 hrs then after wild clicking here and there I found this out, but its fun!!]

Improved UAC :

There was only two states in Vista as Turn on or Turn off UAC, something interesting and different here, see this :

SL10

Now it comes with various states starting from "Always Notify" to "Never Notify" and you can adjust these with scroll bar, it do shows description of each level in right side yellowish box.

Screen Resolution Settings :

On similar lines of UAC, they are now giving Scroll Bar for adjusting the screen resolutions, see this :

SL9

That's all for me about Windows 7, offcourse this was just Lap around, I will be covering more Tips,Tricks and new stuff in and about Windows 7, Hope this post will give you vision about what is coming to you in coming days in terms of "Windows 7" 

So get ready for long ride !! Windows 7 is here..

Vikram.

Tuesday, November 11, 2008

South Asia MVP Open Day '08, Goa ,India

After last meet of all India UG Leads at Bangalore, Another Big event I am attending, In Bagalore meet all UG MVPs were there, we had a great time and great inputs to each other about how we can improve community and implement new things, Also about how things can be done together on India level etc.

Now this time, beside UG MVPs, all Top site owners, Blogger MVPs, Book writers etc. now going to be together at one HOT and FUN place..none other than...GOA !!

So, To all my Blog readers..!! I am going to take break from Friday 14th Nov. 2008 to 18th Nov. 2008 since I will be in summit at Goa.

Offcourse once I come back, I will share all the fun and thrill along with Photos !! :)

MVP Open Day 2008 Badge

Saturday, November 8, 2008

Migrate DataSet to List<Type> for Data Binding for Silverlight 2 Grid.

I have wrote 2 article on Data binding in Silverlight 2, one with normal traditional “asmx” web services and another with WCF services. you can check them at :

http://pendsevikram.blogspot.com/2008/10/silverlight-2-grid-linq-to-sql.html

http://pendsevikram.blogspot.com/2008/10/silverlight-2-grid-with-silverlight.html

There was very well response to both articles..I got lots of mails from many..But the feedback is how one can do it with DataSet [Traditional Data Container] and pass it over service, without using LINQ or migrating to LINQ.

Well Big thanks to Mr. Mahesh Sabnis who is one of my mentor at consulting department where I am working right now, We did it together and came up with this simple code snippet which is self explanatory and you just need to plug it in your service logic and rest will work fine as it was with LINQ to SQL.

       public List<clsEmployee> GetAllEmployee()

       {

           SqlConnection Conn = new SqlConnection("Data Source=.;Initial
Catalog=Company;Integrated Security=SSPI");

           SqlDataAdapter AdEmp = new SqlDataAdapter("Select * from
Employee",Conn);

           DataSet Ds = new DataSet();

           AdEmp.Fill(Ds,"Employee");

           DataTable DtEmp = Ds.Tables["Employee"];

           List<clsEmployee> listEmp = new List<clsEmployee>();

           foreach (DataRow dr in DtEmp.Rows)

           {

               clsEmployee objEmp = new clsEmployee();

               objEmp.EmpNo = Convert.ToInt32(dr["EmpNo"]);

               objEmp.EmpName = dr["EmpName"].ToString();

               objEmp.Salary= Convert.ToInt32(dr["Salary"]);

               objEmp.DeptNo = Convert.ToInt32(dr["DeptNo"]);

               listEmp.Add(objEmp);

           }

            return listEmp;

      }

Let me know your feedback, I would glad to explore if you have any problem areas specific..will be nice to try it !

Vikram.

Friday, November 7, 2008

Bill Gates Visit to my city “Pune” and DreamSpark is here now !!

Bill Gates visit to Pune :

Kindly read more about Bill Gates Visit to Pune on 6th Nov. 2008 at :

News in my regional language [Marathi] :

http://www.esakal.com/esakal/11072008/PuneF5E7103B0D.htm

Photos :

http://www.esakal.com/features/071108/pune_gats/index.htm

DreamSpark :

Microsoft announced a remarkable program for Students all over the world. Now its in India !! :)

There are millions of student across the globe who are seeking a bright career in field of Information Technology and Services.

For doing such courses in IT, lot of money is spend by the Universities and college authorities across globe. This is because Software/Programs/Applications which are involved in it for educating students are normally very high in cost.

Microsoft came with a revolution program as “DreamSpark”
This is I should say a big revolution..

DSPK

For more information on DreamSpark do visit to Indian Version of the DreamSpark Portal at :

http://www.dreamsparkindia.com/dreamspark/

BizSpark :

Microsoft has already a very successful program for IT companies across the world, known as Microsoft Certified Partner program

Now on similar lines of DreamSpark, now they have came up with BizSpark.

BSPK

For more information on BizSpark do visit to the BizSpark Portal at :

http://www.microsoft.com/bizspark/


Vikram.

Thursday, November 6, 2008

Silverlight 2 : Theming from Silverlight 2 Toolkit

It’s now time to put on some cool Themes to your Silverlight 2 Controls.

I have already talked about Silverlight toolkit in my last post, This is add-on to my last post on control toolkit.

There are few built-in themes you will get as control in form of DLL in toolkit setup, see this :

  • Expression Dark
  • Expression Light
  • Rainier Orange
  • Rainier Purple
  • ShinyBlue
  • ShinyRed

DLLS

Here is the sample code for one theme,same is for rest :

<Grid x:Name="LayoutRoot" Background="White">
       <shinyRed:ShinyRedTheme>
             <StackPanel Margin="10">
                <Button Margin="5" Height="28" HorizontalAlignment="Left" Width="86" Content="Vikram"/>
                <ComboBox Margin="5">
                    <ComboBoxItem Content="Vikram Pendse" IsSelected="true"/>
                </ComboBox>
                <CheckBox Content="Ready to Rock??" IsChecked="true" Margin="5"/>
        </StackPanel>
    </shinyRed:ShinyRedTheme>


Outputs for various Themes given in list above :

ExpressionDarkTheme

ExpressionLightTheme

RainierOrange  

RainierPurpleTheme

ShinyBlueTheme

ShinyRedTheme

For more in-depth reading visit following interesting article :

http://www.codeplex.com/Silverlight/Wiki/View.aspx?title=Silverlight%20Toolkit%20Overview%20Part%203&referringTitle=Home

Vikram.

Friday, October 31, 2008

Silverlight 2 Charts : Building Charts using Silverlight 2 Toolkit

Another milestone in Silverlight journey, Release of excellent Toolkit for Silverlight on Codeplex, to know more about it, do visit at :

http://www.codeplex.com/Silverlight

There are few new controls added to the Silverlight Arena as :

    • AutoCompleteBox
    • ButtonSpinner
    • Chart
    • DockPanel
    • Expander
    • HeaderedItemControl
    • HeaderedContentControl
    • ImplicitStyleManager
    • Label
    • NumericUpDown
    • TreeView
    • ViewBox
    • WrapPanel
    I guess rest are very much easy and some are familiar to Web Developers which are relevent to some of the controls in AJAX Control Toolkit e.g AutoCompleteBox,NumericUpDown etc.
    Silverlight Toolkit which exclusively supports Silverlight 2 RTW and easily installable too, To download the bits, you need to visit :

http://www.codeplex.com/Silverlight/Release/ProjectReleases.aspx?ReleaseId=18804

I personally recommend to copy all the DLL files from the Toolkit to C:\Program Files\Microsoft Silverlight\2.0.31005.0\..

This will ease to add to project as reference,and it will be like central repository of all main dll files.This is just for convenience.

Step 1 : Install Silverlight Toolkit by adding reference to DLLs inside Toolkit.

Process is very similar the way we implement for AJAX Control Toolkit, Once you do that successfully, All the controls will be available on Toolbox.

Step 2 : Implement LINQ to SQL to get data for Graph.

Step 3 : Write a Silverlight Enabled WCF service to fetch data.

For Step 2 & 3 , kindly follow my old article step-by-step :

http://pendsevikram.blogspot.com/2008/10/silverlight-2-grid-with-silverlight.html

and

http://pendsevikram.blogspot.com/2008/10/silverlight-2-grid-linq-to-sql.html

Step 4 : Configure the Chart Control and Bind it with Data.

Here I am showing first demo of Pie Chart with List<> [Collection] and then I will show it with service.

XAML Code :

<Grid x:Name="LayoutRoot" Background="White">
        <StackPanel>
            <charting:Chart Height="250" Width="400" Title="PUG –Silverlight Forum Monthly Activity" x:Name="MyPieChart" >
                <charting:Chart.Series>
                    <charting:PieSeries ItemsSource="{Binding}"
                                        IndependentValueBinding="{Binding ProductName}"
                                        DependentValueBinding="{Binding Sales                    </charting:PieSeries>
                </charting:Chart.Series>
            </charting:Chart></StackPanel>
   </Grid>

C# Code :

public partial class Page : UserControl
    {
        public Page()
        {
            InitializeComponent();
            this.Loaded += new RoutedEventHandler(Page_Loaded);
        }

        void Page_Loaded(object sender, RoutedEventArgs e)
        {
            GetProductSales();
         }

        public void GetProductSales()
        {
            List<ProductSales> PieData = new List<ProductSales>();
            PieData.Add(new ProductSales() { ProductName = "Vikram Pendse", Sales = 10.5 });
            PieData.Add(new ProductSales() { ProductName = "Rashi Agarwal", Sales = 20.2 });
            PieData.Add(new ProductSales() { ProductName = "Prachi Oke", Sales = 30.2 });
            PieData.Add(new ProductSales() { ProductName = "Ekta Shetty", Sales = 40.1 });
            MyPieChart.DataContext = PieData;
            MyPieChart.LegendTitle = "User Activity on forums in %";
         }
    }

    public class ProductSales
    {
        public string ProductName { get; set; }
        public double Sales { get; set; }
    }

And output will be something like this :

SLPieUData

Next Step is to bind it with Service and this time I am using Bar charts along with Pie Chart.

XAML Code :

<Grid x:Name="LayoutRoot" Background="White">
        <StackPanel>
            <charting:Chart Height="250" Width="400" Title="ABC Ltd.- Q2 Business Development Report" x:Name="MyPieChart" >
                <charting:Chart.Series>
                   <charting:PieSeries ItemsSource="{Binding}"
                                        IndependentValueBinding="{Binding Salesperson}"
                                        DependentValueBinding="{Binding Percentage}" >
                    </charting:PieSeries>
                </charting:Chart.Series>
            </charting:Chart>
            <charting:Chart Height="250" Width="400" Title="ABC Ltd.- Q2 Business Development Report" x:Name="MyBarChart">
                <charting:Chart.Series>
                    <charting:ColumnSeries ItemsSource="{Binding}" Title="Sales"
                                        IndependentValueBinding="{Binding Salesperson}"
                                        DependentValueBinding="{Binding Percentage}" >
                    </charting:ColumnSeries>
                </charting:Chart.Series>
            </charting:Chart>
            </StackPanel>
    </Grid>

C# Code :

Service Code :

public class MySvc
    {
        [OperationContract]
        public List<MonthlySale> GetSalesData()
        {
            MyDatabaseDataContext db = new MyDatabaseDataContext();
            var temp = from sales in db.MonthlySales
                       where sales.Salesperson.Length > 0
                       select sales;
            return temp.ToList();
        }

    }

[Note : I have created a Table MonthlySales in Northwind Database for testing purpose.]

C# Code with Proxy of the Service after consumption :

public partial class Page : UserControl
   {
       public Page()
       {
           InitializeComponent();
           this.Loaded += new RoutedEventHandler(Page_Loaded);
       }

       void Page_Loaded(object sender, RoutedEventArgs e)
       {
           Proxy.MySvcClient svc = new Proxy.MySvcClient();
           svc.GetSalesDataCompleted += new EventHandler<SL_SilverlightToolkit.Proxy.GetSalesDataCompletedEventArgs>(svc_GetSalesDataCompleted);
           svc.GetSalesDataAsync();
       }

       void svc_GetSalesDataCompleted(object sender, SL_SilverlightToolkit.Proxy.GetSalesDataCompletedEventArgs e)
       {
           MyPieChart.DataContext = e.Result;
           MyPieChart.LegendTitle = "Business Generated in %";

           MyBarChart.DataContext = e.Result;
           MyBarChart.LegendTitle = "Business Generated in %";
       }

   }

And the result will look like :

SLFinalCharts

This is how we can implement Charts in Silverlight 2 using Silverlight Toolkit, Soon I will post more interesting demos in coming days with more and more controls and unique ideas, Hope this will help you to start doing development with Silverlight Toolkit.

Vikram.

Wednesday, October 29, 2008

Windows Azure : Getting Started with Cloud – Part 1

PDC event..A most happening event in world for all techies, unfortunately people like me can’t travel over to US from India due to some restrictions in day-to-day,but thanks to Internet which still gives feels that like PDC is just happening next corner.

Well, before reading this article, I recommend you to visit following site and get all your concepts clear about “Cloud”.

http://www.microsoft.com/azure/webdev.mspx

http://dev.live.com/

If you are willing to work on some of the terms which you must have heard like Cloud Computing and Services, Live Mesh,SaaS [Software As A Service] etc. then Windows Azure is good thing to start of with.

Azure Service platform basically a internet based service hosted in Microsoft Data Centers and provides OS and services with support of variety of languages and protocols to empower developers to create application on the fly and can be integrate with Windows Live Services and Microsoft Dynamics.

For more information visit :

http://www.microsoft.com/azure/whatisazure.mspx

For developing Cloud Service from Windows Azure, you need to download 2 things :

  • Windows Azure SDK
  • Windows Azure Tools for Visual Studio

http://www.microsoft.com/azure/sdk.mspx

One humble note : You have to have IIS installed on your machine else setup might not allow you to install SDK

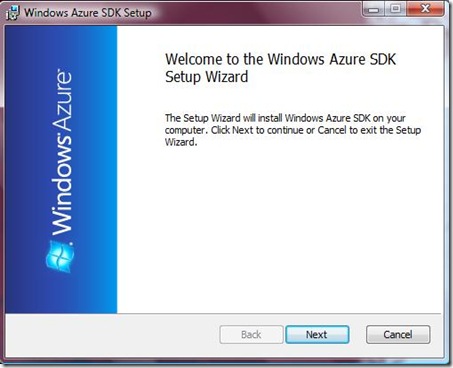
Initial Installation Screen will look like :

az1

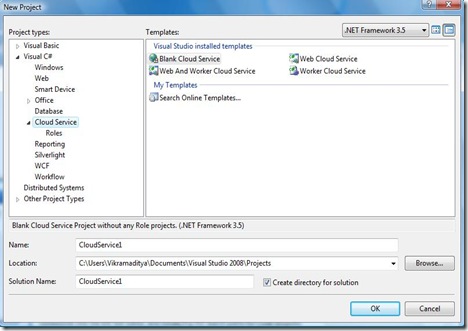
After successful setup of SDK and Tools,Open Visual Studio,There you will find one template under both VB and C# as “Cloud Services”

az2 

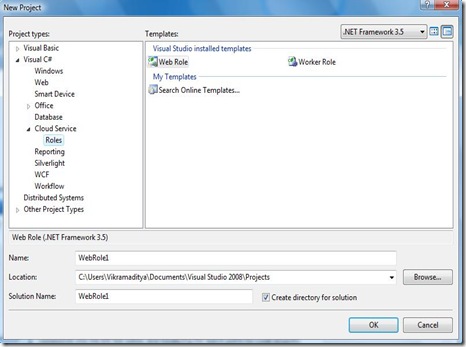
az3

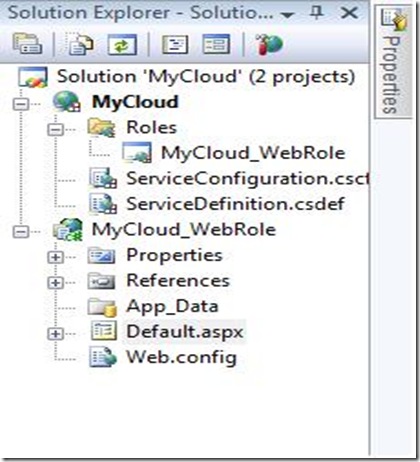
Choose Web Cloud Service and now you will get following structure of Cloud services shown below with a full fledge ASP.NET application.

az6

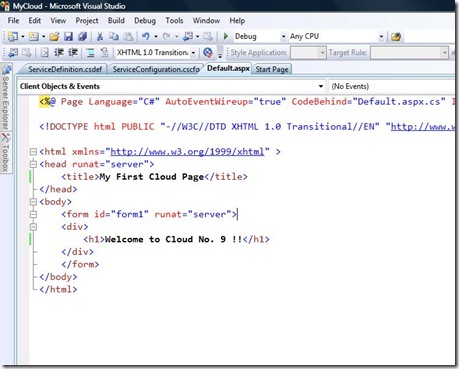
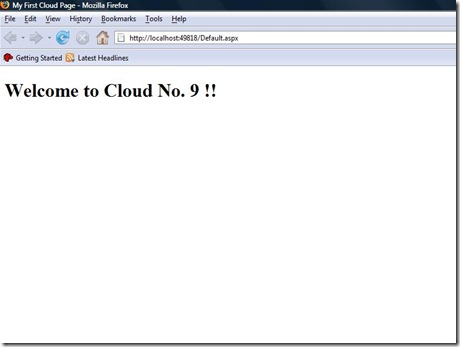
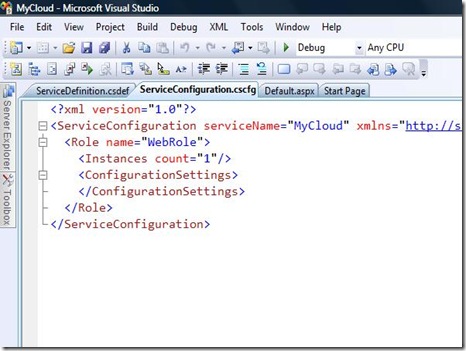
There are two files for Service Configuration and Service Definition, I have added one H1 Tag in my aspx page for testing purpose and once I run this, it will run on local IIS or Visual Studio built-in hosting environment.

az5

az4

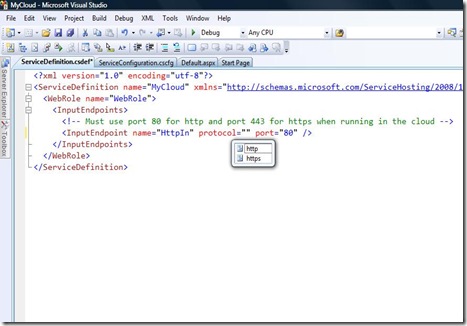
If you want to do some changes like protocol change from http to https etc, you can very well do that from config files, they are close to the config files which we use in WCF services.

az8

Running on http need to be run on Port 80 and https on Port 443.

az7

WebRole and what is exact use of the Instance tag that I will cover in next part of this article soon.

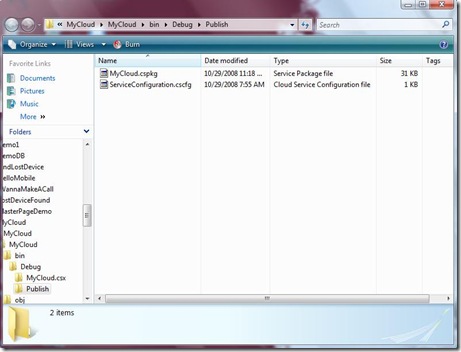
For Deploying this on Cloud you need to right click on Cloud Service project and need to choose “Publish” option, once you click on that, It will generate 2 files which you need to host on Cloud instance.

azpublish

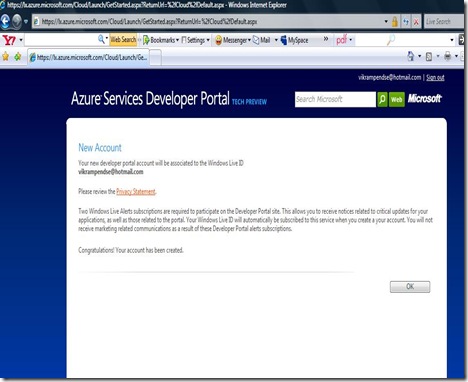
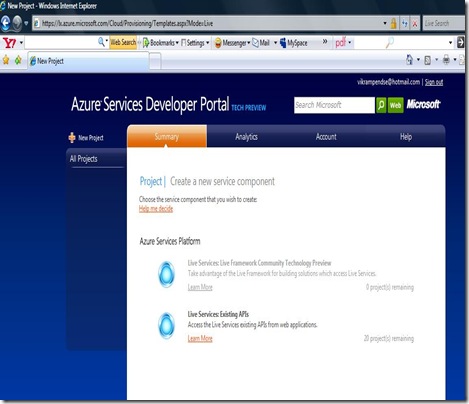
Cloud instance will automatically get open in browser as follows where you need to sign in with Live ID, this is bit similar to Silverlight.live.com service, here also you need to upload the files which are generated during Publish.

azdep1

azdep2

azfinal

Since for final deployment here, one need to have token, I am yet to get that token to move ahead and enable certain services which are right now disabled for me[Refer “Hosting Services” option in above screenshot where I need to host is right now disable]. So hope this will help you to get overall view, will explore it more in depth in coming part of this article.

Vikram.