Saturday, December 4, 2010

Silverlight 5 : What’s there for you and me

I am taking small break in our “Silverlight On Mobile” series for this post. I will not say I am glad but I will say I am happy after what happened at PDC 10. Microsoft Announced The Future aka “Silverlight 5" which is a great breakthrough build coming up if you look at the features list.However there is a still “To be..or not to be..” kind of situation for many of the people after PDC10,but after Scott Gu’s keynote, Vision and Mission is clear for Silverlight from Microsoft.So you can take a beer and relax !

This time..Message is clear : “Future is Bright and Future is Silverlight”

ScottGu

All the fiasco happen due to HTML5 statements in PDC10, tons of things happened across RIA community. Again, Let me tell you from my personal experience, Silverlight is far better choice for LOB/Enterprise RIA Apps than other RIA platforms available and it’s the only choice to build Windows Phone 7 Applications as well.

Before I Copy Paste Silverlight 5 Announced Features, Let me throw my expectations and also let me know your views on the same.

What I am looking at Silverlight to give me in near future …

  • Support for Enterprise Library
  • Support on Blackberry platform like we have on S60
  • Support for Reporting – SSRS specifically
  • Cross Platform – Write Once and run on various platforms
  • Better Profiler tool
  • Simple and Easy to understand Documents/HOL on Silverlight LOB and RIA Services,MVVM pattern

My 0.02 $ on Silverlight 5 and HTML 5, JQuery, Extjs, Flex and other friends :

I may sound Anti Silverlightian here but facts are facts, There is a great demand coming up from end users to get rid of Plug-in methodology and have consistent user experience across Browser and platform,let it be any browser on desktop or mobile devices. Tools and Technology cost should be such that all startups and big shots can go for easily.Right now,people already started Silverlight and HTML 5 comparison Head to Head and which is acceptable in the current business scenario in the world. I am not second to express failure of either and have equal keen interest in HTML 5 being WebDev guy but after announcement of Silverlight 5, I somehow feel that Silverlight has to be in game for a long and with much more different role. I personally do not think that HTML 5 or parallel technologies will kill Silverlight. However they will grow by design and even offer few things which Silverlight is doing today,but I think by that time Silverlight will be in much more good position and will be a unique platform with lots of offerings, So let’s not give away our faith and work we are doing or already done. So be happy..Relax..Silverlight is Silverlight ! ..and it’s the Future of RIA.

Silverlight 5 bits are not for download but you can download the Firestarter event stuff at :

Hands On Labs : http://www.silverlight.net/news/events/firestarter-labs/

Videos : http://channel9.msdn.com/Series/Silverlight-Firestarter?page=1

WCF RIA Services Toolkit December 2010 :

http://www.microsoft.com/downloads/en/details.aspx?FamilyID=6f834bf7-ffde-4d5d-8573-18541762118b&displaylang=en

Silverlight 5 Features announced by Microsoft :

Premium Media Experiences

Silverlight 5 offers improved media support and rich UI capabilities:

  • Hardware Decode and presentation of H.264 improve performance for lower-power devices to render high-definition video using GPU support.
  • TrickPlay allows video to be played at different speeds and supports fast-forward and rewind. At up to twice the speed, audio pitch correction allows users to watch videos while preserving a normal audio pitch.
  • Improved power awareness prevents the screen saver from being shown while watching video and allows the computer to sleep when video is not active.
  • Remote-control support allows users to control media playback.
  • Digital rights management advancements allow seamless switching between DRM media sources.
Business Application Development

Silverlight 5 is Microsoft solution for building next-generation business applications:

  • Fluid user interface enables smoother animation within the UI. Inter-Layout Transitions allow developers to specify animations to apply when elements are added, removed or re-ordered within a layout. This provides smoother user experiences when, for example, items are inserted into a list.
  • Text improvements make it possible to build rich magazine-style text layouts:
    –     Multicolumn text and linked text container allow text to flow around other elements.
    –     Tracking/leading set precisely how far apart each character is for full creative control.
    –     Text clarity is improved with Pixel Snapping.
    –     Text layout performance is significantly improved.
    –     OpenType support has been enhanced.
  • Support for Postscript vector printing enables users to create reports and documents, including the ability to create a virtual print view different from what is shown on the screen.
  • Applications can now work the way users expect with added support for double-click and Combobox type ahead.
  • Databinding enhancements allow more work to be done more easily via XAML:
    –     Debugging support now allows breakpoints to be set on a binding, so you can step through binding failures.
    –     Implicit DataTemplates allow templates to be created across an application to support a particular type by default.
    –     Ancestor RelativeSource allows, for example, a DataTemplate to bind to a property on the control that contains it.
    –     Binding in style setters allows bindings to be used within styles to reference other properties.
    –     The DataContextChanged event is being introduced.
    –     Markup extensions allow code to be run at XAML parse time for both properties and event handlers, enabling cutting-edge MVVM support.
  • Networking and Windows Communication Foundation enhancements:
    –      Reduced network latency by using a background thread for networking.
    –      WS-Trust support: message security — encrypted at the Windows Communication Foundation level; Security Assertion Markup Language authentication token.
  • Silverlight 5 performance improvements include these:
    –     Reduced network latency by using a background thread for networking.
    –     XAML parser improvements that speed up startup and runtime performance.
    –     Support for 64-bit operating systems.
  • Graphics improvements
    –     Graphics Processing Unit (GPU) accelerated 3-D application programming interface (API) provides rich graphics on the Web for building advanced data visualizations and rich user experience (UI).
    –     Immediate mode graphics API allows direct rendering to the GPU.
    –     Hardware acceleration is enabled in windowless mode with Internet Explorer 9.
  • Silverlight offers a new class of trusted applications that brings desktop capabilities to the browser for the first time. These features, when enabled via a group policy registry key and an application certificate, mean users won’t need to leave the browser to perform complex tasks:
    –     Host HTML content as a Web browser control within the Silverlight application. HTML pages, such as help content or e-mail, can be integrated within the application.
    –     Read and write files to the user’s My Documents folder, making it easier to find media files or create local copies of reports.
    –     Launch Microsoft Office and other desktop programs. Users can open Microsoft Outlook and create an e-mail message, or send a report to Word utilizing the power of Office.
    –     Access devices and other system capabilities by calling into application COM components. Users can access a USB security card reader or a bar-code scanner.
    –     Enjoy full keyboard support in full screen, which enables richer kiosk and media viewing applications.
    –     Call existing unmanaged code directly from within Silverlight with P/Invoke.
  • Out-of-browser trusted applications are further enhanced:
    –     Existing unmanaged code can be called directly from within Silverlight with P/Invoke.
    –     Child Window support allows multiple windows to be launched from the application.
  • Tools improvements include these:
    –     Microsoft Visual Studio profiling support including CPU, memory, thread contention.
    –     Visual Studio Team Test support.

So..Let there be light ! ..Silverlight !!

I will be back soon with Windows Phone 7 and much more on Silverlight in Year 2011

Vikram.
Sunday, November 14, 2010

Silverlight On Mobile : Lost Windows Phone 7 Device ? Here is quick help

Nice to open Live Writer after a long time. I was in hospital for one week and went under two surgeries,I was suffering from Hematuria due to kidney stones, Now much better and recovering but still locked at Home.Best thing is now I can use laptop and move bit here and there so I again started looking at Tech Stuff back. More I will start with full zest in coming weeks once I recover totally since I might go for one more operation in coming weeks.

Recently My friend lost his cellphone somewhere in crowd,He told me some story about how he can track device etc. Suddenly come to my mind, is something possible with Windows Phone 7? Windows Phone 7 though its good phone but its truly costly affair if you lost it.Especially the higher cost Devices like Dell and HTC HD7. So I started exploring this issue and found few good things which I want to share with you today. However it has already been shared by many who hold actual device, Since I don’t have device and neither it will be available in India soon, So I am trying my level best about how you can go for that.

Windows Live ID :

Windows Live ID plays a vital role here. If you have Windows Live ID, Life is easy for you.So if you don’t have, get one today !

To Do on Day One once you have Device :

Many common fellows who are non techy might not aware about this, There is a Live Service dedicated for Windows Phone or Windows Mobile in general which you can opt with Live ID at :

windowsphone.live.com

Here you will find screen like this :

Start

Though I don’t have device at the moment,but here are few things which you can get hold on once you have device in hand with help of windowsphone.live.com

Universal steps :

1. Go to your browser on PC, Login to windowsphone.live.com with Live ID

2. Choose “Find My Phone” Option and take it further

This option branched with multiple capabilities below this like :

  • To make your phone ring
  • To map your phone’s location
  • To lock your phone and show a message
  • To erase your phone
  • To change settings to Find My phone

Lets see what each option is capable of :

1. To make your phone ring : This option is not so powerful for lost phone since the actual device is far from you. But lets assume you lost device in your nearby area or home or office,Then all you need to do is sign-in with Live ID on windowsphone.live.com and then Under “Find My Phone” option choose “Ring it”. This will Ring your phone even if volume is off or its on Vibrate mode (Silent mode we call it as). Also you will be able to Preview the ringtone. (Remember the old Cordless Phones in our house with “Find Device” button and it use to buzz the device, this is something similar to that).

2. To map your phone’s location : This option will help you to give actual physical location of device via power of Bing Maps. It also have Print Map option which will allow you to take print out of the last known position of device on Map.Options like “Center Map on my phone” will help you to keep track if you by chance scroll the map and lost the location.Once you identify the location on map you can choose Option 1 to Ring it and go near to it. (No wonder ! Power of GPS and it will highlight the area under which Cell tower area it falls)

3. To lock your phone and show a message : This will lock your phone and no one can use it by any means, However you can unlock by entering 4 digit number,Also you can customize the screen with custom message something like this : “I have lost ! if you find me then please call at (+91)-020-1112-333 or email me at something@something.com or drop it to near by police station”. This will atleast make sure that no one will play with your phone,personal data,pictures,videos and other stuff on your device.

4. To erase your phone : I call it as “Do or Die” option, if all of the above three does not work and you lost all hopes, still it is important to make note that your data(Phone Data,SMS,Numbers,Pictures,Videos etc) are still there and can be misused.So to prevent this, This option will allow you to erase data on your phone and make it dumb device.Oh yes ! it does give “Yes” “No” option so be wise to choose any.(There is no comeback once you click on “Yes”)

5.To change settings to Find My Phone : This is core important option,It allows you to achieve two things : (For this you need to Flick left on Start dashboard and go to App list and choose Settings)

1. Save my location periodically for better mapping : Microsoft with this option will save your phone’s location details periodically (Hourly basis usually),So if your phone goes out of coverage area or battery goes ga ga and die still it will help to save last location position on map (Then onwards its Police job isn’t it?)

2. Get Results Faster : This might cause more battery consumption however by this Live Service will send text message to your device or Push notification is another cheaper option suggested.

So ! Once you get your Windows Phone 7 in your hand fully functional and operable, You must check out this options and do the needful so that by chance or due to bad luck you lost device, there is a hope ! Not all Non techy people are aware of this or not aware of such services, So I encourage you to pass on this information to them as best as you can.

I will recommend this post for more pictorial info on this topic :

http://antondnagy.wordpress.com/2010/09/06/ways-to-recover-your-lost-windows-phone-7-device/

Well in all case, if there is real lost of device, Advisable to let your Service Provider know about it and provide information for the same, This is very important to do as well once you lost your device. This is bit complicated topic and can lead to several branching discussions like damaged device recovery or insurance etc. which at least at this moment I don’t find worth to talk on, So keeping those things to you to explore. As I said I don’t have device in hand, But Once I get I am going to repost this again in much more details so that you can get more in-out stuff of this. Also I will drop more focus on such services for phone in coming future. Let me recover soon and I have few more good things to share with tons of Code and XAML, So give me some more time and I will be back with loads of stuff here. Do keep an eye on this place.

Vikram.

Thursday, November 4, 2010

Silverlight Vs HTML5 : You and Me

In India, we every year celebrate “Diwali” festival which is festival of Light which helps to find path, Its win over dark and all good days to start new things. I am celebrating Diwali festival with my parents in our new home, So I will blog our Tech stuff on Silverlight and WP7 very soon once the festival is over.

However, I am suffering from mild frustration from last week, The Day PDC 2010 Keynote got away, You all know what fiasco and discussions happening all over internet for Silverlight and HTML 5.I am not HTML 5 Guru and neither I am against of any technology.You all know I never write such articles and philosophical stuff which is infinite. I always do tech stuff,but this time pain is so much and so much I suffer in last week, I cannot help myself so I am kind of sharing this with you.Who better can talk on this-a Silverlight MVP.

This blogpost is for those people who just chosen “Silverlight” as platform and new to Silverlight and now victim of this endless fight of Silverlight Vs HTML 5.Idea behind this post is not to pat on back or praise any technology or company.Also I am not interested to put so many Hyperlinks in this post about who saying what on Silverlight Vs HTML 5. I know shit is all over and I don’t need to put it here.

History :

At Microsoft, There is a product “Silverlight” which created wonders in Rich Internet Applications arena around the world from last few years.Despite there were so many other parallel products already in market like Flash, JavaFx etc. Slowly over the period of time it got stable up with decent amount of features which one can imagine and its now a trend.

Cross browser – Cross platform,Rich in looks, Simple to Implement and flexible and which can address day to day business apps scenarios is the simple vision behind Silverlight. (Correct me if I am wrong here). Vision is still the same rather its getting mature by each version.

You :

Silverlight made its presence on Web, Then Out of Browser and now with Windows Phone 7 on Mobile. If some technology is addressing such things, How can it be dead in one day by just one announcement or blog post? Think Twice !!

I do not want to promo any links here just to showcase how Silverlight is wonderful, you all know, tons of apps are out there ! Choosing “Silverlight” for your application as a core platform and then going on with client, I know how much difficult life is ! But with the amount of resources available today, Life is simple.SDKs and Tools are available and decent enough to develop LOB/Enterprise apps.

Don’t waste your valuable time in thinking about HTML5 and what will happen in future. Right now keep focus on your current Silverlight development and upcoming Silverlight development and see how you can do it best with Silverlight.

So, Please please please ! Silverlight is not dead ! If someone told you that then he/she is not your well wisher !!

Me :

I will be here as long as Silverlight technology is here, Even though in future I may not have MVP title but still I will be blogging about Silverlight and related stuff at my best.So don’t worry, This blog is not dead and neither this is my last post. I will be back !

I am available here or on my email id, so please feel free if you have any questions about adopting Silverlight Technology.

In short :

  • Apps are mostly build on top of facts and reality and not only on predictions and philosophy,views of public.
  • Windows Vs Linux, ASP.NET Vs PHP, Silverlight Vs Flash – Ok to read on it while having cup of coffee. Don’t make your business decision only on top of them.
  • Clarify your doubts,concerns,feedback with Microsoft via Right Channels  - Forums, Community, MVPs
  • Create Simple POCs based on Silverlight before going to large implementations, Do deep dive analysis and then go ahead
  • Understand Silverlight Architecture and overall technology
  • Try your best to relate your business needs with features provided by Silverlight so as to come closer to final solution

Bottom-line :

Silverlight is not dead and got a great future ! Tech journalist will not come down to your office and help you in building POCs on Silverlight or HTML5, So make sure you verify the information.

“This Vs That” posts will not add value to you or your customer or your community, Live in real world !

Think first about your customer needs and how better you can serve him, then think about Technology then no matter what it is Silverlight or anything else, Go with it !

Well, I hope you got the message what I want to say here, Keep all the HTML 5 Vs Silverlight stuff aside, open your Visual Studio, File > New Project > Silverlight .. Start !

Silverlight..long live !!

Vikram.
Monday, October 18, 2010

Silverlight On Mobile : Launchers in Windows Phone 7

I hope you like my earlier article on EQATEC Profiler for Windows Phone 7. Today I am going to discuss on another interesting topic as ‘Launchers’.This is very important topic from application development perspective which will allow developers to use some phone specific functionality like Calling, Sending SMS via application which can be either done with functions who are built in the phone.

As per MSDN,Launchers defined as :

A Launcher is an API that launches one of the built-in applications through which a user completes a task, and in which no data is returned to the calling application.

There are many scenarios in which you need to integrate the Calling,SMS etc which are default features of the device but since it’s a sandbox modal you might not be able to grab that directly,Hence APIs comes into picture and this is how Launchers becomes unique for your Windows Phone 7 Application.

Launchers usually take parameters and execute tasks, Their job is not to return something back to the application since we always invoke them with some parameters which we want to process with specific task.Hence you will not find any thing getting return back to the application.This is the default behavior of Launchers.There are several types of launchers however today I am not going to talk much on Marketplace Task etc since its totally a different topic and I will address that in future. Today I am going to cover basic Tasks like Calling, Sending SMS, Search Task and WebBrowser Task etc.This is very useful in case you want build some notification or alert message sending app.

Lets see the Coding part here,I am taking simple Listbox having items as various Launchers or Tasks which can be used from underline API.

XAML Code :

<ListBox x:Name="lstLaunchers" SelectionChanged="lstLaunchers_SelectionChanged">
<ListBoxItem x:Name="lstmphcall" FontSize="24"  Content="Phone Call Task"/>
<ListBoxItem x:Name="lstmsms" FontSize="24" Content="SMS Task"/>
<ListBoxItem x:Name="lstmemail" FontSize="24" Content="E-mail Compose Task"/>
<ListBoxItem x:Name="lstmsearch" FontSize="24" Content="Search Task"/>
<ListBoxItem x:Name="lstmweb" FontSize="24" Content="Web Browser Task"/>
</ListBox>

Namespaces :

using Microsoft.Phone.Tasks;

C# Code :

private void lstLaunchers_SelectionChanged(object sender, SelectionChangedEventArgs e)
        {
            switch (lstLaunchers.SelectedIndex)
            {
                case 0:
                    PhoneCallTask phcalltsk = new PhoneCallTask();
                    phcalltsk.PhoneNumber = "+919122333444";
                    phcalltsk.DisplayName = "Vikram Pendse";
                    phcalltsk.Show();
                    break;
                case 1 :
                    SmsComposeTask smscotsk = new SmsComposeTask();
                    smscotsk.To = "+919122333444";
                    smscotsk.Body = "Party @ Hard Rock Cafe 10 PM Onwards";
                    smscotsk.Show();
                    break;
                case 2:
                    EmailComposeTask emlcotsk = new EmailComposeTask();
                    emlcotsk.To = "sweetheart@example.com";
                    emlcotsk.Body = "Hello, How are you doing? Can we meet on this weekend? Do reply, Vikram.";
                    emlcotsk.Cc = "romeo@example.com";
                    emlcotsk.Subject = "Hi!";                   
                    emlcotsk.Show();
                    break;               
                case 3:
                    SearchTask sertsk = new SearchTask();
                    sertsk.SearchQuery = "XBox game trailers";
                    sertsk.Show();
                    break;
                case 4:
                    WebBrowserTask webrwtsk = new WebBrowserTask();
                    webrwtsk.URL = "http://www.microsoft.com”; 
                    webrwtsk.Show();
                    break;
                default:
                    break;
            }
        }

So this is how you can integrate Launchers in your application. I am calling each in my Switch() and each case represents each functionality like Calling,Sending SMS etc. Please make a note that since you are doing this on emulator which have some limited functionality,hence you might not able to see few things like email unless configuration is made which is limited due to emulator.

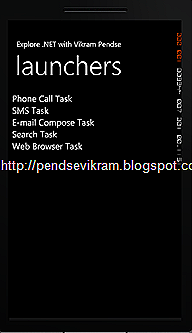
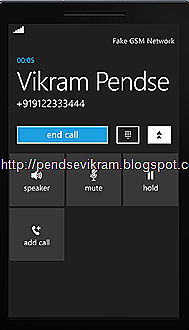
I demonstrated the simplest way,Now you must have understood that how easy it is to integrate in your app. See some of the output shots here which will give you feel of these Launchers.

laun1          launcall

launsms          launsearch

launweb

Hope you will find this useful while building your apps. Media and Marketplace Task I am leaving to you to explore.I might not talk on Choosers in next post but soon I will cover that as well, I have few more interesting stuff in upcoming post. So be here and keep visiting this place.Lot more to come on Windows Phone 7 in coming days.

Vikram.
Tuesday, October 12, 2010

Silverlight On Mobile : Using EQATEC Profiler for your Windows Phone 7 Applications

I hope you like my last article on Invoking WCF service in Windows Phone 7 Application, with that article we are soon moving to CRUD operations, Data Binding and will soon explore various navigations and other features of Windows Phone 7

Today I am writing down this small informative article just to let you all know that we now have World’s first ever Profiler for Windows Phone 7. Two days back I came across it,I downloaded and evaluated at my end. I find it very interesting and useful,so I thought I should go ahead and share with you all. So those of you are building apps or already developed apps for Windows Phone 7, This is the right tool for you to check in and out of performance and other things about your application.

Where to get Profiler :

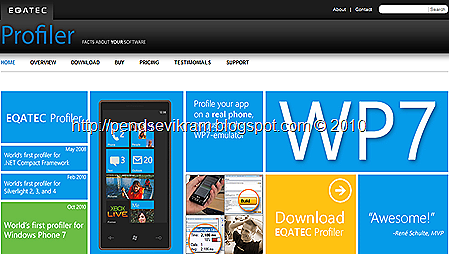
Profiler is developed by EQATEC folks and you can check their website for more information. They have profiler for Silverlight,CF and others as well. Simple download, Free version I have downloaded and I will be using that for this article. You can find forums,FAQs and other information on their portal.

eqatec9

You can visit for more  : http://www.eqatec.com/Profiler/Home.aspx

Build :

Installation process is very simple and straight so no twists and turns in that. Once you installed this profiler, Start it !

eqatec1

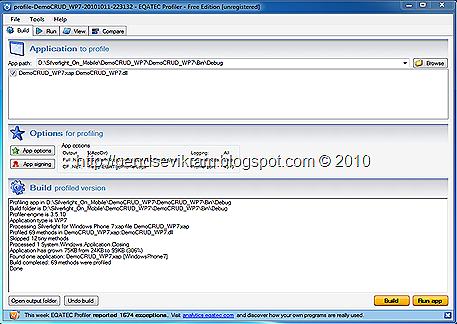
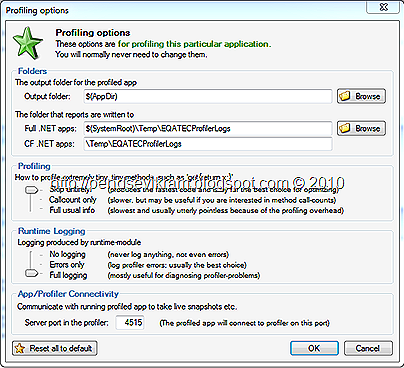
This is the initial screen you will be getting once you start the Profiler. You are suppose to click on “Browse” button to locate your application dll (Not XAP) which you can find in Debug folder.You will also get various options for the overall Profiler environment by clicking on “Add options”, you will get following window for more options :

eqatec2

Once you pick your dll, then you need to click on build (profiled version) and then click on Run.

Run :

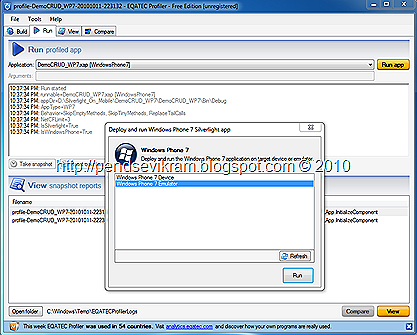
Once you hit “Run” button, it will prompt you and you need to specify whether you are connected to actual device or an emulator. In my case,its emulator :

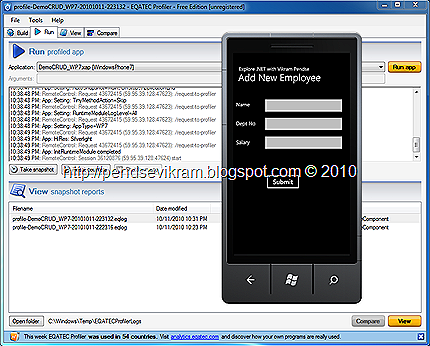
eqatec3

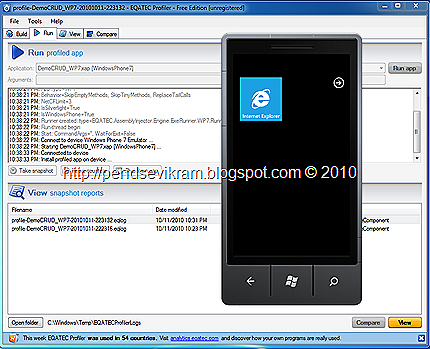
Once you make a choice, it will port your app and you then need to wait till app gets started on any.

eqatec4

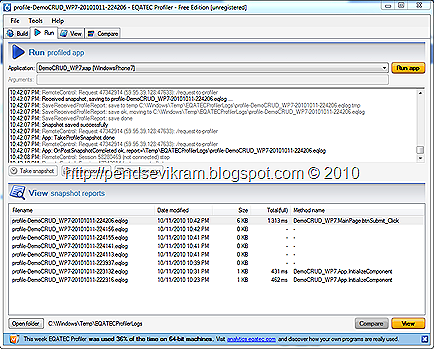
Once your application starts, you will find that “Take snapshot” and “Reset Counters” buttons on Profiler are enabled, so now you can start profiling and taking snapshots as per your requirements.

eqatec5

You can take multiple snapshots and you can see them listed in “snapshot reports” option from where you can view individual.

eqatec7

View :

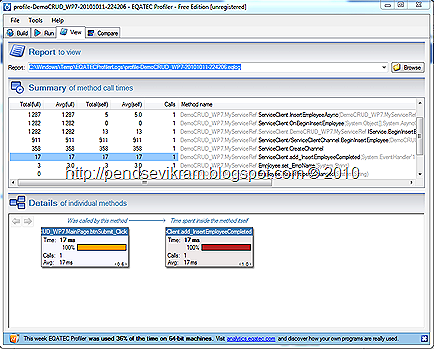
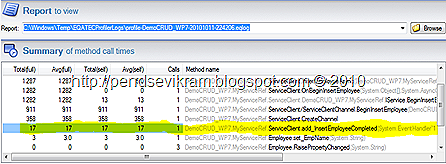
Once your snapshot activity is over, you can see individual report (.eplog) file by selecting it and clicking on “View” like this :

eqatec6

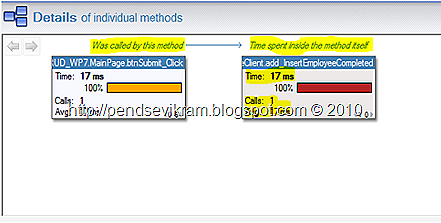
eqatec_rep

eqatec_repo

In this way you can find each small details with your app.

Compare :

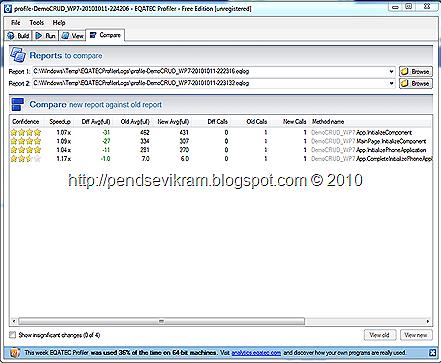
EQATEC Profiler provides facility to compare to profiling reports, In this way you can compare your results and can do needful with your app. You are suppose to select two which you want to compare from UI and then you will be getting comparison amongst the two.

eqatec8

That’s all from my side today about the Profiler for Windows Phone 7. I encourage you to kindly download and evaluate this World’s first Windows Phone 7 emulator, If you have actual device by chance or wish to see how it will work on actual device, then check this Channel 9 Video :

http://channel9.msdn.com/posts/Worlds-first-profiler-for-Windows-Phone-7

Keep visiting this place, tons of stuff coming on your way for Windows Phone 7 and Silverlight.

Vikram.

Sunday, October 3, 2010

Silverlight On Mobile : Invoke WCF Service and Data Operations in Windows Phone 7

I hope you like my last post on InputScope.Many of you dropped me email and asking about Data representation and Data binding,operations on Windows Phone 7.Till now I kept prime focus on basic structure and functionalities,capabilities of device.Now we are in good position to talk about data,So let’s talk about it today.In past, I have wrote decent amount of articles on Data Binding and CRUD operations using Grid,DataForm in Web version of Silverlight. Thanks for your massive positive response for that.Now let’s see what we can do on Windows Phone 7 with the Silverlight Framework available on it.

I am going to split this article in 2 parts :

  • Adding WCF Service to Windows Phone 7
  • Doing Insert Operation using WCF service with SQL as backend

For this example,I am using a simple table schema in SQL as :

Constraints Field Name Data Type Null / Not Null
PK (Autogen) empno int Not Null
  ename nchar(10) Allow Null
  deptno int Allow Null
  salary int Allow Null

* Data Types are just taken for sake of Demo,In reality I encourage you to choose proper Data Types which are suitable

I am using same Project Template i.e Windows Phone 7 Application, So nothing rest is changed for this. After doing above schema,you can put your records in it or have your own schema instead.Now lets talk about first part which is Adding WCF Service to Windows Phone 7

Adding WCF Service to Windows Phone 7 :

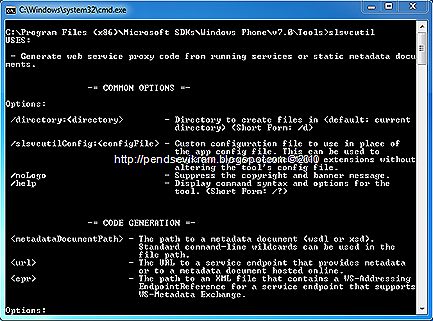
Many of my friends told me that they have some issues on Adding Reference through Visual Studio and also with generation of Config file with WCF. Frankly, I never came across this with my instance of Visual Studio, But by chance if you, then you can try with command line utility “SLSvcUtil.exe” for this purpose like this :

slsvcutil

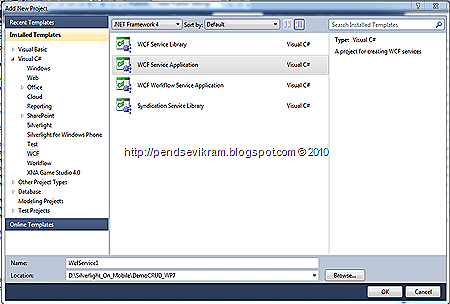
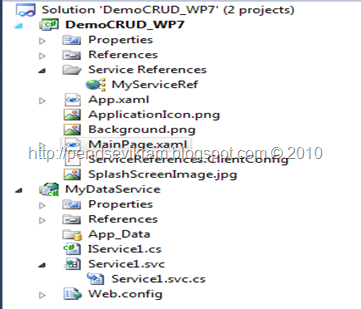
In normal scenario, You need to add WCF Application Project to your solution like this :

addingwcf

Here goes the Service Code :

Service Contract :

[ServiceContract]
    public interface IService
    {
        [OperationContract]
        bool InsertEmployee(Employee emp);
    }

Operation Contract :

[DataContract]
   public class Employee
   {
       [DataMember]
       public int EmpNo { get; set; }
       [DataMember]
       public string EmpName { get; set; }
       [DataMember]
       public int DeptNo { get; set; }
       [DataMember]
       public int Salary { get; set; }
   }

Implementation :

public bool InsertEmployee(Employee emp)
        {
            bool Inserted = false;
            Conn = new SqlConnection("Data Source=.;Initial Catalog=EmployeeWP;Integrated Security=SSPI");
            Cmd = new SqlCommand();
            Conn.Open();
            Cmd.Connection = Conn;
            Cmd.CommandText = "Insert into  Employees Values (@EmpName,@Salary,@DeptNo)";
                      
            Cmd.Parameters.AddWithValue("@EmpName", emp.EmpName);
            Cmd.Parameters.AddWithValue("@DeptNo", emp.DeptNo);
            Cmd.Parameters.AddWithValue("@Salary", emp.Salary);

            int ins = Cmd.ExecuteNonQuery();
            if (ins > 0)
            {
                Inserted = true;
            }

            Conn.Close();
            return Inserted;
        }

* I am using “Select” query for demo purpose, it might not be in “Best Practice” format, so do the needful in your application or have Stored Procedure. Also Empno is Auto generated field so no parameter for that.

So,part one is over.This is how you can add WCF service to your Windows Phone application. Like Insert I have done here, you can add Update,Delete and Select methods as per your application demands.May be in coming days,I will demonstrate full CRUD operation scenario,but to start with it,its I think sufficient. Also not that,since it’s a demo, I have not hosted it on IIS and working fine for me,In reality, you need to host it as a “Best Practice”

Doing Insert Operation using WCF service with SQL as backend :

This is our second part of article, Here we will create a simple UI and invoke WCF service we created above, We will refer this service and pass data via UI to service and then finally service will do the needful and we will have relevant data in Database.

XAML Code :

Title Panel :

<!--TitlePanel contains the name of the application and page title-->
        <StackPanel x:Name="TitlePanel" Grid.Row="0" Margin="12,17,0,28">
            <TextBlock x:Name="ApplicationTitle" Text="Explore .NET with Vikram Pendse" Style="{StaticResource PhoneTextNormalStyle}"/>
            <TextBlock x:Name="PageTitle" Text="Add New Employee" Margin="9,-7,0,0" Style="{StaticResource PhoneTextTitle1Style}" FontSize="40"/>
        </StackPanel>

Layout :

<!--ContentPanel - place additional content here-->
       <Grid x:Name="ContentPanel" Grid.Row="1" Margin="12,0,12,0">
           <TextBlock Height="33" Margin="0,39,0,0" TextWrapping="Wrap" Text="Name" VerticalAlignment="Top" Grid.Column="1" HorizontalAlignment="Left" Width="88" d:LayoutOverrides="GridBox" FontSize="21.333"/>
           <TextBlock Height="43" Margin="0,114,0,0" TextWrapping="Wrap" Text="Dept No" VerticalAlignment="Top" Grid.Column="1" HorizontalAlignment="Left" Width="88" FontSize="21.333"/>
           <TextBlock Height="45" Margin="0,189,0,0" TextWrapping="Wrap" Text="Salary" VerticalAlignment="Top" Grid.Column="1" HorizontalAlignment="Left" Width="73" FontSize="21.333"/>
                      
           <TextBox Grid.Column="1" Height="73" Margin="108,22,8,0" x:Name="txtname" TextWrapping="Wrap" VerticalAlignment="Top"/>
           <TextBox Grid.Column="1" Height="73" Margin="108,95,8,0" x:Name="txtdeptno" TextWrapping="Wrap" VerticalAlignment="Top"/>
           <TextBox Grid.Column="1" Height="73" Margin="108,169,8,0" x:Name="txtsal" TextWrapping="Wrap" VerticalAlignment="Top"/>

           <Button Content="Submit" Height="75" Margin="116,0,185,250" x:Name="btnSubmit" VerticalAlignment="Bottom" Click="btnSubmit_Click"/>
       </Grid>
It will look like this :


Add Service Reference :

reference

C# Code :

General Declaration :

MyServiceRef.ServiceClient Proxy;
bool IsNewInsertFlag = false;

Constructor :

// Constructor
public MainPage()
{
        InitializeComponent();

       Proxy = new MyServiceRef.ServiceClient();
}

Code to Insert Record :

private void btnSubmit_Click(object sender, RoutedEventArgs e)
{
      IsNewInsertFlag = true;
      if (IsNewInsertFlag == true)
     {                
         Proxy.InsertEmployeeCompleted += new System.EventHandler<MyServiceRef.InsertEmployeeCompletedEventArgs>(Proxy_InsertEmployeeCompleted);
        Proxy.InsertEmployeeAsync(new MyServiceRef.Employee (){EmpNo=0,EmpName=txtname.Text,DeptNo=Convert.ToInt32(txtdeptno.Text),Salary=Convert.ToInt32(txtsal.Text)});
      }
}                  

void Proxy_InsertEmployeeCompleted(object sender, MyServiceRef.InsertEmployeeCompletedEventArgs e)
{
     bool Res = e.Result;
     if (Res == true)
     {
         MessageBox.Show("Record Added Successfully !!");
     }
     else 
     {
         MessageBox.Show("Unable to Insert record,Try Again !!"); 
     }
}

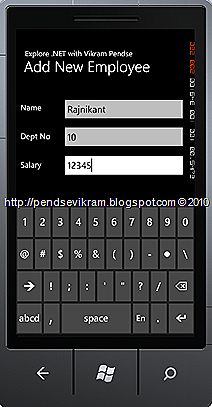
Done !, So now hit F5 and put one record to test like this :

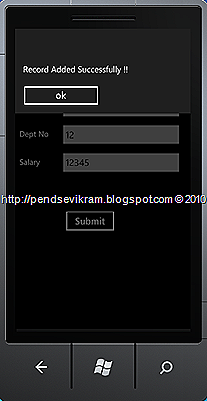
InsertIntoAfter Clicking on Submit, It will insert new record and send note on UI like this :

success
So,here is end of our second part and hence the article. You can enhance the UI part as per your design skills and you can add some InputScope,Jazzy background or styles depends on your application. I will surely try to bring more jazz in this app in coming days and will try to cover full functional CRUD. Till that time you guys go ahead and give a try for this. I tried to make things simple,but if you feel or have or want to share more simple way than this, Please do give me feedback so that I will make note of that in my coming articles. I am coming with much more stuff soon including Silverlight 4 and Windows Phone 7,So keep visiting here..lot more to come !

Vikram.
Tuesday, September 28, 2010

Silverlight On Mobile : InputScope in Windows Phone 7

After a long break,I am back here finally.Well, You must have already downloaded the latest RTM bits of Windows Phone 7,If not already then download from here. In my upcoming post I will surely cover the new things like Pivot Viewer and newly added stuff in RTM bits of Windows Phone 7.Now lets focus on today’s topic.This is very short post but its important to know the InputScope in Windows Phone 7 since we will need that every now and then while asking user to key in data for your application.Every phone has keyboard, so what so great about this InputScope in Windows Phone 7?

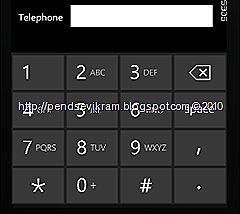
This is actually known as SIP (Software Input Panel) which is a virtual keyboard which get invoke on screen once your Textbox or the equivalent control is focused and awaits for user input. Advantage of InputScope is to offer wide range of ways by which one can enter data. These are Text,Numeric,Chat Symbols, Telephone Numbers etc. While surfing I found out that there are around 62 InputScopes for Windows Phone 7. There are two ways we can implement this InputScopes which are via XAML or via Code. I personally recommend that if you know what are your fields and what input they are suppose to take then do it via XAML, Otherwise you can do it programmatically as well by looping over various types of InputScopes. Lets first see how the default InputScope looks like as :

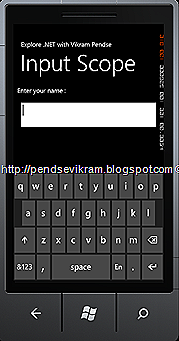
sip1

Above is the default layout of the virtual keyboard of Windows Phone 7. This InputScope is “Default”.Now lets see how we can apply it.

XAML Code :

<TextBox InputScope="Number" Height="73" />

Above is the one approach,Another approach is to embed InputScope between opening closing tag like this :

<TextBox TextWrapping="Wrap" VerticalAlignment="Top">
     <TextBox.InputScope>
            <InputScope>
                 <InputScopeName NameValue="Digits"/>
            </InputScope>
     </TextBox.InputScope>
</TextBox>

C# Code :

sipcsharp

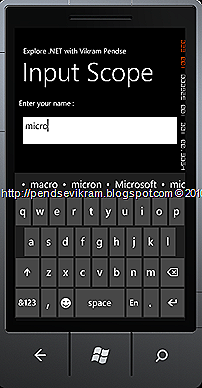
NameValue are actually generated as Enum and you can have InputScope class from Namespace System.Windows.Input. So for doing this via code, you will be referring System.Windows.Input namespace.When you don’t specify any value it is treated as “Default”. The “Text” InputScope is something different than “Default”. “Text” provides suggestions as well once you start key in the textbox. Take look at this :

siptext

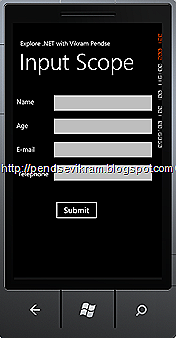
Here is sample code of Registration App where I am showcasing various InputScopes :

<Grid x:Name="ContentPanel" Grid.Row="1" Margin="12,0,12,0">           
            <TextBlock Height="33" Margin="0,39,0,0" TextWrapping="Wrap" Text="Name" VerticalAlignment="Top" Grid.Column="1" HorizontalAlignment="Left" Width="88" d:LayoutOverrides="GridBox" FontSize="21.333"/>
            <TextBlock Height="43" Margin="0,114,0,0" TextWrapping="Wrap" Text="Age" VerticalAlignment="Top" Grid.Column="1" HorizontalAlignment="Left" Width="88" FontSize="21.333"/>
            <TextBlock Height="45" Margin="0,189,0,0" TextWrapping="Wrap" Text="E-mail" VerticalAlignment="Top" Grid.Column="1" HorizontalAlignment="Left" Width="73" FontSize="21.333"/>
            <TextBlock Margin="4,266,0,0" TextWrapping="Wrap" Text="Telephone" Grid.Column="1" HorizontalAlignment="Left" Width="104" d:LayoutOverrides="GridBox" Height="32" VerticalAlignment="Top" FontSize="21.333"/>
           
            <TextBox InputScope="Number" Grid.Column="1" Height="73" Margin="108,22,8,0" TextWrapping="Wrap" VerticalAlignment="Top"/>              
            <TextBox Grid.Column="1" Height="73" Margin="108,95,8,0" x:Name="AgeOfUser" TextWrapping="Wrap" VerticalAlignment="Top">
                <TextBox.InputScope>
                    <InputScope>
                        <InputScopeName NameValue="Digits"/>
                    </InputScope>
                </TextBox.InputScope>
            </TextBox>
            <TextBox Grid.Column="1" Height="73" Margin="108,169,8,0" TextWrapping="Wrap" VerticalAlignment="Top">
                <TextBox.InputScope>
                    <InputScope>
                        <InputScopeName NameValue="EmailNameOrAddress"/>
                    </InputScope>
                </TextBox.InputScope>
            </TextBox>
            <TextBox Grid.Column="1" Margin="108,242,8,292" TextWrapping="Wrap">
                <TextBox.InputScope>
                    <InputScope>
                        <InputScopeName NameValue="TelephoneNumber"/>
                    </InputScope>
                </TextBox.InputScope>
            </TextBox>
            <Button Content="Submit" Grid.Column="1" Height="75" Margin="116,0,185,174" VerticalAlignment="Bottom"/>           
        </Grid>
    </Grid>

Output will be like this :

sipop

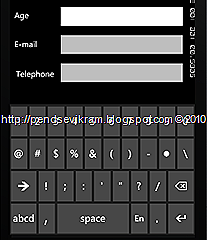
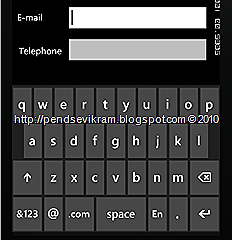
Let’s see various other InputScopes :

sipage sipemail

siptelecon

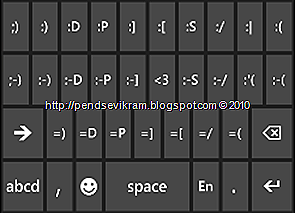
This one is my favorite : Chat !

sipchat

Well,That’s all from me on InputScope in Windows Phone 7 at the moment, you can check more information on MSDN here

There is a nice “tap tap” sound while you type with this SIP, however at the moment you might not be able to play with it but you can surely enjoy that sound on emulator, For more on this Sound and related stuff, check out this Channel 9 Screencast.

I am coming back here with more stuff on WP7 very vey soon, I know I am bit lazy and posts are getting delay for some reason due to my schedule but I am working on it very hard and soon you will see tons of new things here. Till then..have fun !

Vikram.
Saturday, September 4, 2010

Silverlight On Mobile : Application Bar for your Windows Phone 7 Application

I hope you like my last article on Ink Capabilities, Also I am getting tons of email for Charting on WP7 and many of you made request for source project. Within few weeks, I am planning to keep all codes on a central web location and share url with you so that you all can download and explore more on bits I show here.

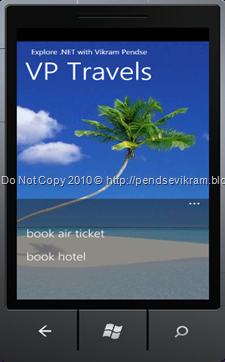
Coming back to our today’s topic, Today I am going to demonstrate Application Bar which will be a unique integral part of any of your application which you are planning to build on Windows Phone 7 platform.Application Bar allows you to choose various options or you can say it acts as a menu for your application. It sits at the bottom side of your application and you can invoke it on touching on “” invoker/trigger to pull out application bar which I am going to demonstrate here.

There are two straight forward ways to build Application Bar

  • With Built-in infra (XAML)
  • Custom Creation

What I mean by custom creation is that you will create it in code something like this :

ApplicationBar = new ApplicationBar();

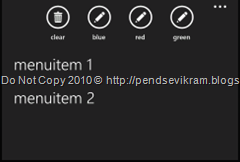
In both the cases you will have to code since even in first case though your infra will be ready by XAML, you need to take care of click event of each item via code.So can’t run away from code ideally in both the scenarios.Let us first see how Application Bar look like, here is a small look :

AppBarwotxt

AppBartxt

Uncomment code and default App Bar is Ready :

When you start new Windows Phone 7 Application Project Template, By default the XAML for App Bar you can find commented in your MainPage.xaml like this :

<!-- Sample code showing usage of ApplicationBar
   <phone:PhoneApplicationPage.ApplicationBar>
       <shell:ApplicationBar IsVisible="True" IsMenuEnabled="True">
           <shell:ApplicationBarIconButton x:Name="appbar_button1" IconUri="/Images/appbar_button1.png" Text="Button 1"></shell:ApplicationBarIconButton>
           <shell:ApplicationBarIconButton x:Name="appbar_button2" IconUri="/Images/appbar_button2.png" Text="Button 2"></shell:ApplicationBarIconButton>
           <shell:ApplicationBar.MenuItems>
               <shell:ApplicationBarMenuItem x:Name="menuItem1" Text="MenuItem 1"></shell:ApplicationBarMenuItem>
               <shell:ApplicationBarMenuItem x:Name="menuItem2" Text="MenuItem 2"></shell:ApplicationBarMenuItem>
           </shell:ApplicationBar.MenuItems>
       </shell:ApplicationBar>
   </phone:PhoneApplicationPage.ApplicationBar>
   -->

This is what I was talking about “Developing with Ready Infra” above. To start with you just need to uncomment the above code and your default Application Bar is Ready !

AppBar : Inside out

Before going for actual development, it is necessary to understand first what all things we have in AppBar, they are :

  • ApplicationBar Icon Buttons (Offcourse with Icons)
  • Menu Item (Text based)

Your application on your business requirements can have Icon buttons or Menu items or both.You can do this via smartly commenting out IconButton XAML part or MenuItem XAML part vice-versa.Together it will look like this :

AppBarwtMenuitemAs per your application background and application requirement, you can always play with the Opacity property for best user experience,like this :

  opacityappbar

Before I land into coding part,Here are some things to look at :

Mind your Text ! :

If you are under impression that you can use lengthy Text for your IconButton, then you are having wrong mindset…really? yes ! If you try to put larger text,it will not allow you by any means to wrap it around (I tried out using many ways but my all attempts are FAIL !), see this is how it will look like with chopped text (Where Ticket is chopped to tick) :

CropIssue

Picture speak thousand words ! :

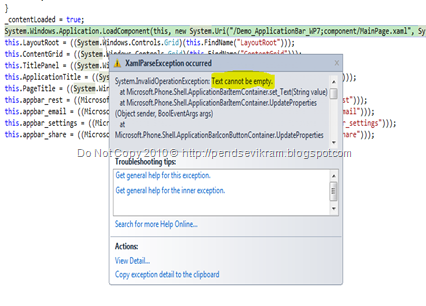
If you are strong believer of above quote,then its good but this will not work if you just try to Put Icon Image without any text. It will throw a runtime exception like this :

txterr

Make sure you follow Design Guidelines aka Standards ! :

There is information available about UI UX related to Phone and you can find it over Internet,more correctly over MSDN. There you can find information like what format of Image should be there for IconButton, What should be ideal size etc. information available. Following this guideline will help you while pushing your application to Customers via Application Market / Marketplace. I personally tried a lot to play around standards and try to make-break kind of things, I realized that Images have to be monocolor and in specific size else you will land into something like this :

IconIssue
Changing looks of AppBar by applying colors :

Not a big deal ! you have both Properties :

  • BackgroundColor
  • ForegroundColor

Anything Beyond IconButtons and MenuItems ? :

I took this concern to my fellow Silverlight MVPs on mail who are also doing wonderful things on Windows Phone 7. I got great inputs from them. Thanks to Shawn Wildermuth for his idea for Popup ( You should visit his article on Popup control on Windows Phone 7 here ) . If you intend to show something customize things like Extra controls or some color palette then AppBar might not help you directly to achieve this due to the default behavior of AppBar. So you can do such things either by your own customize design or on Popup.

Via Code :

Lets see the coding approach to build AppBar.

Namespace :

using Microsoft.Phone.Shell;

General Declaration :

ApplicationBar MyAppBar = new ApplicationBar();

Making ApplicationBar Enabled :

MyAppBar.IsVisible = true;
MyAppBar.IsMenuEnabled = true;

IconButton, Text and Event :

//Add Icon Button
            ApplicationBarIconButton MyAppBarTwoBtn = new ApplicationBarIconButton(new Uri("/Images/appbar.feature.email.rest.png",UriKind.Relative));
            MyAppBarTwoBtn.Text = "Hotel";
            MyAppBarTwoBtn.Click += new EventHandler(MyAppBarTwoBtn_Click);

//Adding IconButtons to Application Bar
MyAppBar.Buttons.Add(MyAppBarTwoBtn);

Event Handle :

void MyAppBarTwoBtn_Click(object sender, EventArgs e)
{
      MessageBox.Show("Hotel Room Booked !");
}

So this is how you can add it via C# Code. Similar technique is for MenuItem, I leave that to you to explore via C# Code, Hope this much of guideline will make your life easy for MenuItem.Instead of MyAppBar.Buttons.Add( ) it will be MyAppBar.MenuItems.Add( )

With this, I am closing this topic at the moment since I think this is more than sufficient for you to get idea about AppBar. I know some of you will raise your eye over this blog post since this is bit away from “Silverlight” and more towards phone though I title it as “Silverlight on Mobile”,but I will not be doing any compromise over any of the topic under Phone 7, I will soon again start talking on Silverlight once this series gets over.

So in coming days you might see here some stuff which is not Silverlight but part of Windows Phone 7. My intention of this series is to help you to get familiar get closer and get comfortable with Windows Phone 7 ecosystem.I will try my best !

See you soon with more stuff on Windows Phone 7 using our “love” platform Microsoft Silverlight.

Vikram.

Saturday, August 14, 2010

Microsoft Silverlight 4 and SharePoint 2010 Integration by Packt Publishing : Book Preview

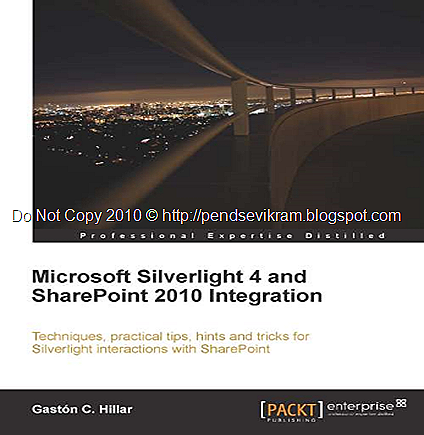
I am more than happy to share that the book which keep me involved so much from past few months,finally got published and also now available on Packt Publishing and Amazon. Yes ! I am one of the Reviewer of this book with my fellow friends Marius Constantinescu,Laurent Duveau and Russell East. The book is published by Packt Publishing. I worked as reviewer for this Book which is now titled as “Microsoft Silverlight 4 and SharePoint 2010 Integration”. Gastón C. Hillar is Author of this book.This book is very unique ! With SharePoint 2010 lot many features got introduced by Microsoft, Along with that, Silverlight is another Technology which is creating a solid wave in Technical communities around the universe.

BookImage

About Author :

Read Bio here : https://www.packtpub.com/authors/profiles/gast%C3%B3n-c-hillar

Target Audience :

All Silverlight and SharePoint Developers and Enthusiast with some awareness about both technologies.

Acknowledgement Section :

I am happy to share these images out of book with you :)

Author’s words :

Reviewers

I dedicate this Book to My Family,Friends,India MVP Program and Team Silverlight at Microsoft for all their support for my work and activities :)

mylal

My Personal views on this Book :

As we are all aware that Silverlight is Cross Browser Cross Platform Technology and works as Plug-in Mechanism. Silverlight is helping businesses across the world in their day to day apps which we term as Line Of Business applications.

SharePoint on another hand, helping businesses to automate their most of the processes, Keeping day to day things centralized. I mean SharePoint have so many features under one hood. Its all in one solution for business as we know.

This book is about the Integration of Silverlight with SharePoint. In each chapter,Author shows us how the integration is powerful and how one can create wonders out of that.

About the Book : (via Packt Publishing site)

    • Develop and host Silverlight Rich Internet Applications in SharePoint 2010 Pages
    • Deploy and debug a Silverlight RIA included in a SharePoint solution by using the new SharePoint deployment features offered by Visual Studio 2010
    • Take advantage of Silverlight 4 features to create rich UX for SharePoint solutions
    • Work with asynchronous SharePoint requests and queries, and debug their execution
    • Retrieve information from SharePoint lists, workflows, and libraries
    • Use Silverlight applications to read, insert, update, and delete items from SharePoint 2010 lists and external data sources
    • Combine external data sources in SharePoint 2010 and interact with them through Silverlight
    • Create Web Parts that host multiple Silverlight applications
    • Create Visual Web Parts that render Silverlight applications
    • Consume SharePoint 2010 WCF Data Services in Silverlight applications
    • Use Silverlight multimedia controls and features to display information to users taking advantage of the processing power offered by their client computers
    • Enhance the responsiveness offered by SharePoint 2010 Visual Web Parts by transforming them into Silverlight Rich Internet Applications


Other Reviews by my friends :

Davide Zordan : http://www.davidezordan.net/blog/?p=2065

Russell East : http://russelleast.wordpress.com/2010/08/04/integrating-silverlight-4-with-sharepoint-2010/

Siddharth Mehta : http://siddhumehta.blogspot.com/2010/08/microsoft-silverlight-4-and-sharepoint.html

My Rating : * * * * * (5 Stars)

Would you like to check out Sample Chapter ? : https://www.packtpub.com/sites/default/files/0066-chapter-1-integrating-silverlight-4-with-share-point%20.pdf

Want to Buy this book? For all details,visit :

https://www.packtpub.com/microsoft-silverlight-4-and-sharepoint-2010-integration/book

I would like to say big “Thank You” to Poorvi,Geeta,Wilson from Packt Publishing and their entire Team who given me opportunity to become Reviewer of this unique book which will be going to be a unique resource of Microsoft Silverlight 4 and SharePoint 2010 Integration. Thanks to Pack Publishing once again !

How can I forget you guys? :) ..You are the one who always shown confidence in me. Given me encouragement for my work in Silverlight Technology and Community work I am doing along with my day to day routine..Million Thanks to all of you !!

See you soon with some more books..Silverlight and much more !

Vikram.

Silverlight On Mobile : Ink Capabilities on Windows Phone 7

Hope my last post on Charting on Windows Phone 7 went well for you and you must have explore that in depth. Today I am going to talk on Ink capabilities on Windows Phone 7. As you all know, Ink capabilities is nothing new to us, I have already made 2 posts on Ink in Silverlight in past. Since Ink is functionality provided by Silverlight 3, I am going to utilize the same on Phone 7 since we all know Silverlight 3 is main platform on Phone 7.

For this, I am taking typical Windows Phone 7 Application project. For Ink capabilities, you will need reference of following :

  • System.Windows.Ink
  • System.Windows.Media
  • System.Windows.Input
  • Microsoft.Phone.Controls

Remember, The challenge on Phone 7 will be performance not for Ink but for any app you write. So as usual, I will advice you to keep things simple and not make them too jazzy. In this app, I am going to make use of App Bar (Application Bar). I know that we have not touch upon App bar in our earlier discussions, but for time being, just try to understand the syntax part of it and I will cover that App Bar in my next post since its totally a new discussion and there are lot many small things to explore. If you don’t find App Bar comfortable at moment, you can surely replace that with normal Command Buttons as I have shown in my old posts on Ink Capabilities in Silverlight.

Let us first see at the XAML part for good design.

XAML Code : For Guys n Gals who don’t want App Bar

<Grid x:Name="ContentGrid" Grid.Row="1">
          <InkPresenter x:Name="inkP" Background="Pink">
              <Button Height="73" Width="114" Foreground="Black" Content="Blue" x:Name="btnBlue" Click="btnBlue_Click" Canvas.Left="126" Canvas.Top="466" />
              <Button Content="Red" Height="72" Foreground="Black" Width="116" x:Name="btnRed" Click="btnRed_Click" Canvas.Left="230" Canvas.Top="466" />
              <Button Height="72" Width="116" Foreground="Black" Content="Green" x:Name="btnGreen" Click="btnGreen_Click" Canvas.Left="336" Canvas.Top="466" />
              <Button Height="74" Width="114" Foreground="Black" x:Name="btnClear" Content="Clear" Click="btnClear_Click" Canvas.Left="21" Canvas.Top="466" />
          </InkPresenter>
      </Grid>
The Code in Italic represents the respective buttons for drawing and you need to handle and write code in each click of button respectively.

XAML Code : For Guys n Gals who are comfortable with App Bar

<Grid x:Name="ContentGrid" Grid.Row="1">
            <InkPresenter x:Name="inkP" Background="Pink">
            </InkPresenter>
</Grid>

<phone:PhoneApplicationPage.ApplicationBar>
       <shell:ApplicationBar IsVisible="True" IsMenuEnabled="True">
           <shell:ApplicationBarIconButton x:Name="appbar_clear" IconUri="/Images/appbar.delete.rest.png" Text="Clear" Click="appbar_clear_Click"></shell:ApplicationBarIconButton>
           <shell:ApplicationBarIconButton x:Name="appbar_blue" IconUri="/Images/appbar.edit.rest.png" Text="Blue" Click="appbar_blue_Click"></shell:ApplicationBarIconButton>
           <shell:ApplicationBarIconButton x:Name="appbar_red" IconUri="/Images/appbar.edit.rest.png" Text="Red" Click="appbar_red_Click"></shell:ApplicationBarIconButton>
           <shell:ApplicationBarIconButton x:Name="appbar_green" IconUri="/Images/appbar.edit.rest.png" Text="Green" Click="appbar_green_Click"></shell:ApplicationBarIconButton>
       </shell:ApplicationBar>
</phone:PhoneApplicationPage.ApplicationBar>
There is also another option of “Menu Item”..but as we decided, not to speak too much on App Bar and focus more on Ink, so time being don’t scratch your head for this.

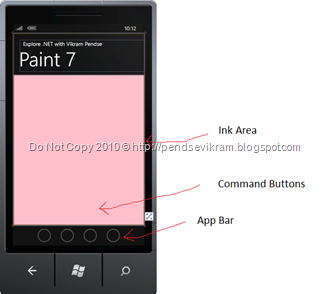
This peace of XAML will show the design like this :

InkDesign

From above snap, Understand the three main parts as “Ink Area”, “Command Buttons” and “App Bar”. Ink Area is area where you are going to Draw whatever you like with Ink. Out of Command Buttons and App Bar, depends what you implement in your development.

Namespaces :

using System;
using Microsoft.Phone.Controls;
using System.Windows.Ink;
using System.Windows.Input;
using System.Windows.Media;

Global Declarations :

Stroke s;
int mycol = 0;

Constructor :

inkP.MouseMove += new MouseEventHandler(inkP_MouseMove);
inkP.MouseLeftButtonDown += new MouseButtonEventHandler(inkP_MouseLeftButtonDown);
inkP.MouseLeftButtonUp += new MouseButtonEventHandler(inkP_MouseLeftButtonUp);

Mouse Events :

void inkP_MouseLeftButtonUp(object sender, MouseButtonEventArgs e)
       {
           s = null;
       }

       void inkP_MouseLeftButtonDown(object sender, MouseButtonEventArgs e)
       {
           inkP.Cursor = Cursors.Stylus;
           inkP.CaptureMouse();
           s = new Stroke();
           s.StylusPoints.Add(e.StylusDevice.GetStylusPoints(inkP));
           switch (mycol)
           {
               case 0: s.DrawingAttributes.Color = Colors.Black;
                   break;
               case 1: s.DrawingAttributes.Color = Colors.Blue;
                   break;
               case 2: s.DrawingAttributes.Color = Colors.Red;
                   break;
               case 3: s.DrawingAttributes.Color = Colors.Green;
                   break;
           }
           inkP.Strokes.Add(s);
       }

       void inkP_MouseMove(object sender, MouseEventArgs e)
       {
           if (s != null)
           {
               inkP.Cursor = Cursors.Stylus;
               s.StylusPoints.Add(e.StylusDevice.GetStylusPoints(inkP));
           }
       }

Application Bar :

private void appbar_clear_Click(object sender, EventArgs e)
{
      inkP.Strokes.Clear();
      mycol = 0;
}

private void appbar_blue_Click(object sender, EventArgs e)
{
      mycol = 1; 
}

private void appbar_red_Click(object sender, EventArgs e)
{
      mycol = 2; 
}

private void appbar_green_Click(object sender, EventArgs e)
{
      mycol = 3; 
}

Note : Same code will work if you put this in Command Button Click event.
Now just hit F5 and your Paint app is ready ! With Ink you can do much more things like stroke adjustments,colors and lot many things which you use to do it in Web based Silverlight Ink App.

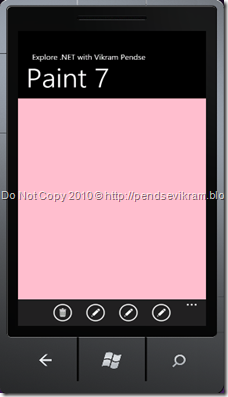
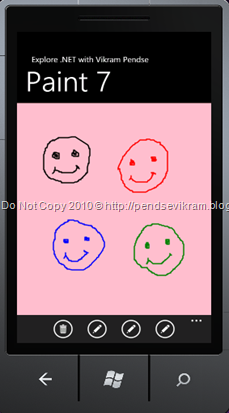
The initial screen will look like this :

GettingReady

You can draw strokes with color strokes options from Command Button if you have or from App Bar like this :

Strokes

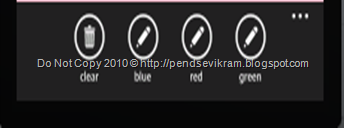
App Bar options have some Text, so you will be able to identify each of them and not to get confuse by white icons.It will look like this :

Appbar1Appbar2
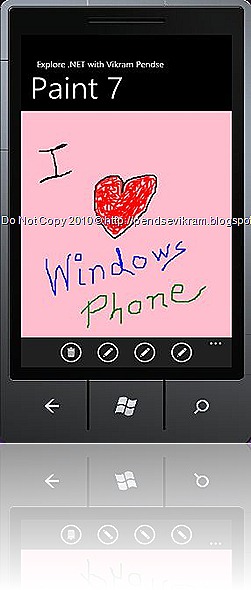
I hope with this information, you must have understood that how quickly we can implement Ink on Windows Phone 7 with minimum efforts and minimum code. Do let me know your feedback, I am coming with much more stuff in next week..Till then enjoy WP7 Development !

ILUWP

Vikram.