Tuesday, June 24, 2008

My Blog on iPhone.

I am regular reader of http://www.asp.net site, If I am in office, I don't miss to read this site while having a cup of Tea.

Today I found an interesting article there about developing ASP.NET AJAX applications for iPhone which is one of the hot selling phone all over the world. I am frankly speaking, a Big HTC Phone fan.I still feel that HTC Diamond which is the latest release has edge over Apple iPhone, still I am not a better judge for this.

I thought I should share this nice portal URL with you people,especially who are crazy for iPhone, so go to following URL

http://www.testiphone.com

It is a online web based iPhone simulator which you can use for regular browsing of web pages, it gives feel like you are surfing Internet on iPhone, It do allow to rotate that Handset into 90 Degrees too for exact simulation.

So I directly tested my blog on that, here are some of the screens :

ip1

Vix1

So..got the feel of my blog on iPhone??

Well, This portal also contains some good information about iPhone simulation, As far as ASP.NET AJAX applications are concerned, There is not yet any separate SDK i found especially for .NET integration.

Its fun to test this simulator, hope you will like it,especially iPhone fans.

I am bit surprise..I have not came across such web based simulator for HTC phone.

Vikram.

Sunday, June 15, 2008

Silverlight 2.0 Beta 1 : Lap Around with Install Experience.

Silverlight is back in action with its latest release as "Silverlight 2.0", making mark all over now in Web developers communities around the world.

We all know from previous versions of Silverlight that it depends on Silverlight runtime, I don't know why Microsoft has not put that as integral part of .NET 3.0/3.5 Framework itself, If Ajax can be built in feature then why we still need silverlight runtime to download separately.

Well,Lets not bother much about this, You need to have Silverlight SDK to be download so as to design and develop Silverlight based applications. This can be downloaded from Microsoft website.

Once you install a file name as "Silverlight_chainer.exe" setup file, Then you can say you are ready for Silverlight experience.

sl3

You can find Silverlight Template with two options as "Silverlight Application" and "Silverlight Class Library" , You choose application to proceed, well do notice that you will not find those option if you go for Multitargeting option to .NET 2.0 and 3.0, please make note of this that you select right .NET Framework.

Once you click on OK, you will get following screen :

sl4

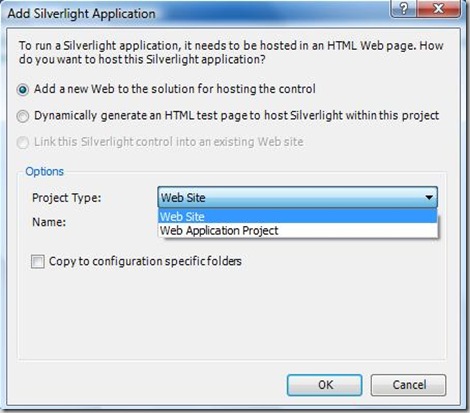
Now, its quite confusing for newbies, so if you are not familiar with those two options, I think their text is quite self explanatory.

One will be just sample host and another will be with application and host. Go for WebSite option and click on OK.

Now check the Toolbox and Solution Window one by one:

sl5 

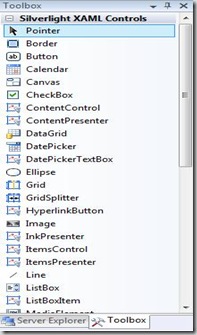
Big Surprise..I ask many people but I don't got any clue yet, why those intrinsic controls of Silverlight XAML Controls on Toolbox cannot be Drag and Drop on Design window but it can get invoke in XAML Code window..I don't know whether it won't happen at all or its a BUG !

Now check Solution Explorer Window :

sl8

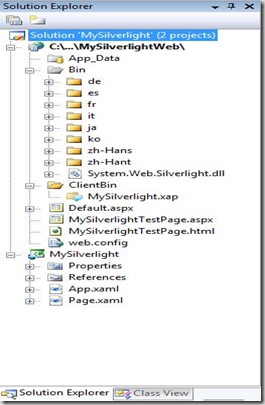
As you can see that since we have chose "WebSite" option while creating new Silverlight application, due to that choice we have several things here, notice the System.Web.Silverlight.dll , Notice MySilverlight.xap file. This .xap is nothing but manifest and contains all necessary information to run application.

We also have 2 test pages as "MySilverlightTestPage.aspx" and "MySilverlightTestPage.html".

Upto this we took lap around Silverlight 2.0 Beta 1, Now lets see some more information on customizing the Install Experience of Silverlight.

Normally you see the following screen when you don't have Silverlight runtime :

sl1

You can very well customize this message and you can also apply styles to it to make it more friendly and generous to user.

If you see the code of "MySilverlightTestPage.html" as :

<objectdata="data:application/x-silverlight," type="application/x-silverlight-2-b2" width="100%" height="100%">

<param name="source" value="ClientBin/MySilverlight.xap"/>
<
param name="onerror" value="onSilverlightError" />
<
param name="background" value="white" />

<a href="http://go.microsoft.com/fwlink/?LinkID=115261" style="text-decoration: none;">

<img src="http://go.microsoft.com/fwlink/?LinkId=108181" alt="Get Microsoft Silverlight" style="border-style: none"/>
</
a>
</
object>

Yes, .xap file is there under ClientBin, So is Silverlight.js file gone?, Answer is no, its still under framework folder and you can very well invoke that too.

In this object tag, I can wrap this one with <div> and I can create my own version of install experience to make it more user friendly and customizable.

Now its turn for "MySilverlightTestPage.aspx", well now you have <asp:Silverlight> control for your help, It has <PluginNotInstalledTemplate> tag to display error message, I have customize this to show you how it looks like.

<div style="height:100%;">
<
asp:Silverlight ID="err"runat="server" > <PluginNotInstalledTemplate>
   <
divstyle="vertical-align:top;"align="center">
 
Explore.NET with Vikram Pendse<br />
  
Blog is Silverlight enabled, Please install Silverlight by clicking on image below<br /><b>its FREE Download..so Download it and exprience the richness with Silverlight</b><br />
</
PluginNotInstalledTemplate>
</
asp:Silverlight>
<
asp:Silverlight ID="Xaml1"runat="server"Source="~/ClientBin/MySilverlight.xap"MinimumVersion="2.0.30523"Width="100%"Height="100%" />
</
div>

This will customize the typical Traditional looking error message to friendly and user defined one.It will look like as below :

sl7

This is how you can control totally the Install Experience of Silverlight using Silverlight 2.0 Beta 1.

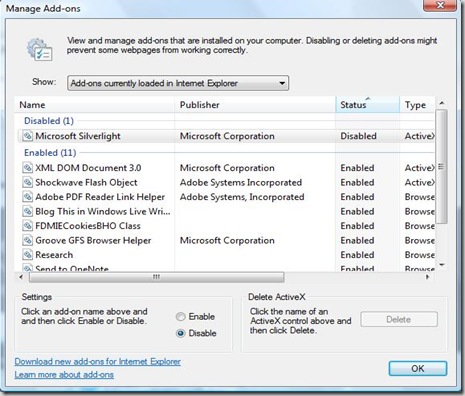
Well, Twist in this is that, if you have installed Silverlight then how will you get this screen?..any guesses?..simple simple simple..

Just Open Internet Explorer Click on "Tools"-->"Manage Add-ons"-->"Enable or Disable Add-ons", This will show you a window with variety of options, you just need to Click on Microsoft Silverlight and make it Disable so as to experience this customize Silverlight Install Experience which we have created above.

sl2

That's it!! ..done with it..I will be back soon with more actual Silverlight Applications in form of articles here which will be thrill to program.

-Vikram.

Friday, June 6, 2008

Microsoft Popfly : Step by Step

Yet another revolution from Microsoft I can say.
This wonderful tool which helps to create smart mashups and web designs using Microsoft Silverlight as one of its component.

It is a unique publicly available tool which can be used with Windows Live ID, so rush if you don't have Windows Live ID.

Right now though it is online,but it can be integrated with Visual Studio, you need to download Popfly Explorer so as to use it with Visual Studio.
I will surely cover that part in my upcoming article.

When you done with your Live ID registration or if you have it already then..let's start.

Step 1: Login and Choose Create a Mashup option.

First go to :

http://www.popfly.com/

You will see the following screen.

pop1

We are right now considering the simple Mashup, So choose "Create a Mashup" option on screen which is first option or you can choose it from "Create Stuff" Menu option on menu bar.

Step 2: Choose Right Block for Mashup

This is total part of one's creativity, you have lots of choices to be chosen from Blocks provided by Popfly on left hand side, see the image below.

pop2

either you pick one of them or you can search them by search option provided on top. Middle part is what you can call as design interface or arena where we will put our blocks, mostly Drag and Drop from left side toolbox.

I have chosen two blocks for my Mash development, Live Image Search and Photo Carousel.

Behind the scene, its quite simple logic..image search result will be displayed on Carousel output block, we just need to set parameters.

Step 3 : Set Parameters for Block

Now please see the following image,

pop3

You can see a Blue Image on top, where you can see a symbol of some gauge, you just need to click on it and it will zoom up the block for you, an Interface will be thrown where user can choose operations, these operations are differ from block to block, depends on what block you have chosen, it might be different for Facebook block and totally different for Live Maps.

Once you set parameters, In this example I have set them as "Windows Vista Wallpapaer" and "20" so finally it suppose to show me 20 images on my Carousel.

Click on Ok to save those and you will again thrown back to initial screen.

Step 4 : Combine two Blocks

Now you need to combine two blocks to archive final expected result, You just need to click on Blue color circle on Left which is a Live Image Search Block and drag it to circle at right on Carousel Blue color circle and you will see a arrow going form left to right, which means data/parameters will flow from Live image search block to Carousel block. See the image below.

pop5

Step 5 : See the Final Output  

Now you just click on "Preview" option which is at top and below menu bar and you will see the following result

pop6

You done with it !!

Step 6 : Deploy it on your Blog !!

So, its time for real action and so as to deploy it on your blog/live spaces etc. first click on "Save"/"Save As" which are at top of screen, Once you save them, you will find a button "i" just next to save option,which is on mouse over will show you message as "Get information", click on it and you will get following setup kind of window on your screen.

pop9

Here you need to click on Third option on Top as "Share" this project. You will find a HTML [iFrame] code which you just need to copy paste on your blog's HTML section and you are done with it. if you wish to see how it looks like when you put it on Blog, visit following URL and see the bottom most section.

http://pendsevikram.blogspot.com

Hope, this will encourage all developers to start using Popfly technology, I will back with more soon.

Thanks,

Vikram.

Sunday, June 1, 2008

My Sessions in May at IndSearch Pune

Its damm Happy moment for me to take sessions that too on Microsoft Technology and again on .NET..went perfectly for me..!!

I just completed a year to pass my Master's from IndSearch, and I felt very proud when college as me to give some input to student community there who are now going to choose .NET as their specialization subject for their MBA IT course.

I took 3 Sessions each for 2.5 Hrs on VB.NET from 19th May to 21st May 2008.
There were about 40 + students and their faculties, This was specially conducted for Students who are doing their final year project,
Internship and those who are suppose to work on .NET once they pass out their course.[Final Year MBA IT students]
Feedback will be available with me soon, Here are the details of 3 days.

Platform used for session : Windows Vista, Visual Studio 2008, SQL Server 2005.

Day 1 : 19th May 2008 : Introduction to .NET
Topics I covered :
1. DLL HELL
2. Introduction to .NET Framework
3. .NET program life cycle [Compilation,CLR etc ]
4. Demos on Console Application
5. Demos on Windows Application [ I shown ErrorProvider Control, Masked Edit TextBox, Opacity feature of Windows form etc]

Day 2 : 20th May 2008 : Object Oriented Programming and ASP.NET Introduction
Topics I covered :
1. Datatypes, Introduction to Conversion class,Namespaces,Visual Studio IDE features.
2. Classes,Objects,Inheritance
,Polymorphism [Demos on each of one]
3. Error Tracking [ Try Catch..Also I shown things like StackTrace etc]
4. Introduction to ASP.NET, Basic Page Life Cycle, Differences between ASP and ASP.NET
5. Demos on WebForms [ Events and Concept of Codebehind, Postbacks etc. Basic Demos I shown ]

Day 3 : 21st May 2008 : ADO.NET and Introduction to Latest Technologies available with .NET
Topics I covered :
1. What is Connected and Disconnected Architecture? Why it is called as Disconnected Architecture.
2. What are DataAdapter,DataSets,DataTables
3. Demo on DataTable which shows how to add Rows and Columns with Data and Type
4. Demo on DataReader
5. Demo on DataSet
6. Demo on XML file binding to Grid and Writing XML file from DataSet.
7. Introduction to WPF and demos on WPF which shows UI richness and features over traditional WinForms.

It was really good experience for me, I got very good feedback too. I am planing some more sessions there especially on ASP.NET and AJAX.

Vikram.